You can link your Google Drive account to Beacon to streamline the process of importing external files and creating new curriculum components. This article describes the process of creating a new lesson by importing files that are stored in Google Drive. To manually create a lesson, see Creating a Lesson. For information about creating a lesson from files stored on your device, see Importing a Lesson.
Quick Guide
Do one of the following:
To import a lesson without automatically linking it to other components, select Lessons from the main menu. Click the New button and choose Import from Drive.
or
To import a lesson and connect it to an existing course and unit, first open the course and unit to which to connect the imported file(s). In the Lessons section for the unit, select Add Lesson and then choose Import from Drive.
If this is your first time importing from Google Drive, follow the prompts to connect your account.
In the Drive window, choose the file(s) to import and then click Select.
Confirm the name of each file and then do the following:
If importing a single file, select Import.
orIf importing multiple files, select the Import files as one lesson checkbox to add all files to a single lesson or leave it empty to create a new lesson from each file. If selected, a Lesson Title field appears where you can enter a custom name for the lesson. Select Import.
A checkmark appears next to each file name to confirm a successful import. Select Done. Beacon creates and automatically opens to the newly created curriculum component so that you can edit and add to it as needed.
Illustrated Guide
Step 1: Access the Import from Drive option either from Lessons or from Courses:
Import from Lessons
To import a lesson without connecting it to other components, select Lessons from the main menu. Click the New button and choose Import from Drive.
.png)
.png)
Import from Courses
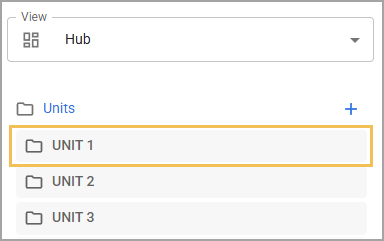
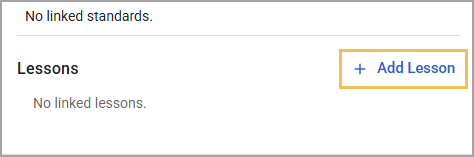
To import a lesson and connect it to an existing course and unit, first open the course and unit to which to connect the imported file(s). In the Lessons section for the unit, select Add Lesson and then choose Import from Drive.
.png)
Step 2: If this is your first time using Google Drive with Beacon, the system prompts you to connect an account. Follow the prompts to Authorize Google Drive Access. This grants Beacon access to files in your Google Drive only for the purpose of uploading them into Beacon. Once uploaded, your files can only be seen by you and the people that you share them with inside Beacon.
Privacy Notice: Eduphoria does not collect or process Sensitive Personal Information. For more information, review our Privacy Policy.
Step 3: Once connected, the Select a file window appears. Drill down into your Drive folders or use the search bar to find and select the file(s) you want to import. To import multiple files, hold the Ctrl key and click each file to import. Click the Select button to confirm the selected file(s).
Caution: Beacon displays file names as they appear at the time of upload. Make sure the file name in your file manager matches how you want it to appear in Beacon so that you do not need to rename it later.
.png)
Step 4: Confirm the name of each file and then do the following:
If importing a single file, select Import.
or
If importing multiple files, select the Import files as one lesson checkbox to add all files to a single lesson or leave it empty to create a new lesson from each file. If selected, a Lesson Title field appears where you can enter a custom name for the lesson. Select Import.
.png)
Step 5: A checkmark appears next to each file name to confirm a successful import. Select Done. Beacon creates and automatically opens to the newly created curriculum component so that you can edit and add to it as needed.
Note: If you no longer plan to import files from Google Drive, you can disconnect your account by following these instructions from the Google Help Center.