System administrators can create and set up the school year’s instructional calendar. The information required in the instructional calendar depends on the applications you have purchased, as the calendar is used across several Eduphoria applications, including Aware, Beacon, Forethought, and Strive. The most important information to enter in the instructional calendar is the school year's start and end dates.
After you have finished setting up the instructional calendar, you must also create a new reporting calendar for use in Aware.
Quick Guide
Log in to Eduphoria and select Management.
Select the Organization Settings gear ().
Select Create New Calendar to start the wizard.
Select New Instructional Calendar and then click Next to continue.
Use the calendar menu to select the First Instructional Date and then click Next to continue.
Use the calendar menu to select the Last Instructional Date and then click Next to continue.
Choose the number of reporting cycles and then select Begin Editing Instructional Calendar.
Use the Previous and Next arrows to navigate between months in the calendar and mark important dates, such as weekends, holidays, or student holidays. Select each relevant date and Day Type, and then select Update Day Information.
Verify that you have set the first and last instructional dates correctly for Strive and Beacon and holidays for Forethought, and create a new reporting calendar for Aware.
Illustrated Guide
Step 1: Log in to Eduphoria and select Management.
.png)
Step 2: From the main menu, select the Organization Settings gear ().

Step 3: From the resulting drop-down menu, select Create New Calendar to start the Create New Calendar wizard.
.png)
Step 4: Select New Instructional Calendar and then click Next to continue.
.png)
Step 5: Use the calendar menu to select the First Instructional Date and then click Next to continue.
.png)
Step 6: Use the calendar menu to select the Last Instructional Date and then click Next to continue.
.png)
Step 7: Choose the number of reporting cycles and then select Begin Editing Instructional Calendar.
Tip: A term is the period of time set by your district. Typically, a semester is considered as two terms but the number of terms could vary for your district. A cycle is a grading period during the term. If you set the number of terms to two and cycles to three, you're setting six total grading periods across the school year.
.png)
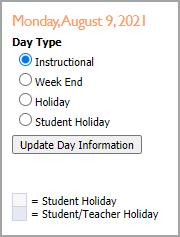
Step 8: Use the Previous and Next arrows to navigate between months in the calendar and mark important dates.
To change the Day Type, select the date.
Choose one of the Day Type options:
Instructional – Regular school days.
Week End – Regular non-school days, weekends.
Holiday – Days when both students and staff are not in school.
Student Holiday – Days when students are not in school, often including professional learning workshop days or teacher work days.
Select Update Day Information.
Note: Holidays do not count against technician statistics for requests in Helpdesk.
.png)
Step 9: Be sure you have set the first and last instructional dates correctly for Beacon and Strive; otherwise, no further calendar setup is required for them. However, if you are using Aware or Forethought, more calendar setup is needed. Create a new reporting calendar for use in Aware, and verify holidays for Forethought.
Verifying Instructional Dates for Beacon
As teachers add content blocks to their Planners in Beacon, all Day Types come into play. Teachers cannot add content blocks to their Planners on a Week End, Holiday, Student Holiday, before the first date of the instructional calendar, or after the last date of the instructional calendar. This ensures that teachers only plan to teach lessons on days their students are in school.
The instructional calendar also affects the duration of units and how they appear in the Planner. If Unit 1 has a duration of 10 days, the unit starts on the first day of the instructional calendar and ends on the tenth instructional day. Unit 2 then starts on the next available instructional day.
Verifying First and Last Dates for Strive
The start and end dates for many Strive Reports default to the first and last date of the instructional calendar. When you archive evaluations, dates default to the instructional calendar’s first and last date. Start term dates on the correct first date and end the term the day before the next term starts, leaving no gaps for weekends or breaks.
Verifying Holidays for Forethought
To set up your instructional calendar for Forethought, identify student and staff holidays per your district calendar and mark them on the instructional calendar as shown in step 8 above.