The Facilities&Events inventory system is a database,, and importing requires accurate data. The steps for importing require a little bit of research to prepare your import file so that you can easily upload and create the content. Imports do not replace; they duplicate. Therefore, it is important to get this data correct before running the importer.
Watch the Wednesday Webinar explaining the importer tool:
Set up the Importer
To understand what the importer needs, the first step is to access it to view its requirements.
Step 1: Access a simple CSV file. It will not be the inventory file. Either create a blank file or find a small CSV file to use as a key to enter the importer.
Step 2: Access Facilities&Events.
Step 3: Click the Manage tab.
Step 4: Click Import Assets.
Step 5: Click the Start a New Import button at the top.
Step 6: Navigate to the simple CSV file, and click Upload.

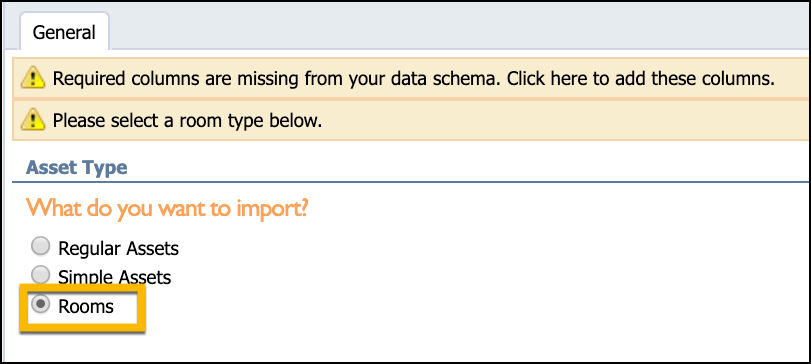
Set the Import Asset Type
In the case of a room import, click the Rooms option. Your screen options change based on which type of asset is selected.
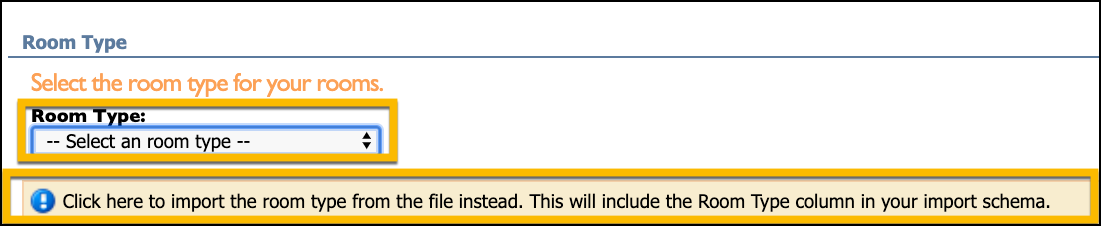
Define the Room Type
You can define the room type in one of two ways. Either use the drop-down to select a specific room type for each room in your importer, or click the option to import the room type from a column you create in your CSV file.
Define Your CSV Data Schema
Step 1: Drag the columns from the the left to the right for what you want to submit in your CSV file. The columns are the headers of data you will include in the CSV file when you import the rooms.
General Information includes basic categories required such as Campus, Room Number, and Room Type.
Custom Properties are any additional properties you would like to track for a room.
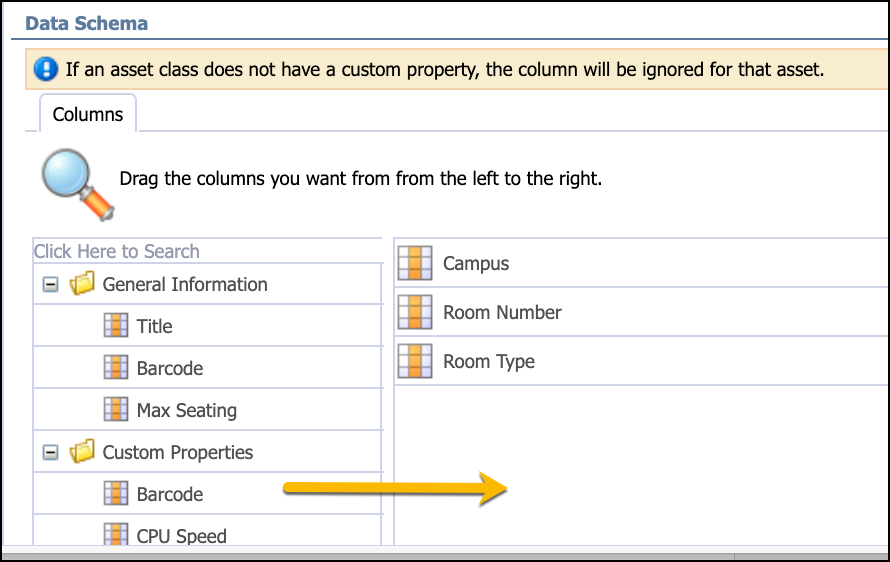
Note: The order of your schema needs to match the order of data in the CSV header. From the example above, Column A would be the Campus; Column B is the Room Number; Column C is the Room Type.
Step 2: Once you have seen the importer, click the Delete button at the top of the screen to remove your simple CSV file and return to the Manage tab.
Create the Importer Data Fields
The following are the recommended data fields for your import:
Campus: The name entered as the campus in your CSV file MUST MATCH the name listed in Eduphoria System Management.
Room Type: The name entered as a room type must match a field that exists as a room type defined in the Manage tab.
Click on Manage.
Click on Room Types.
Create Room Type.
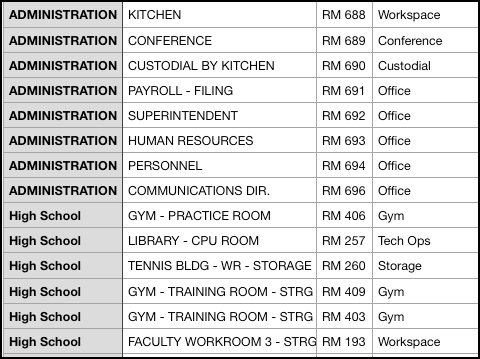
Title: This is a field that can be used if you have a different room name than the room number. For example, a Library may also be room #A107; with Library as the title or the room and A107 as the Room Number.
Below is a sample import CSV with columns in this order: Campus, Title, Room Number, Room Type.
Step 1: Once you have all the data in your CSV file to upload, make sure the data schema matches the order you will set for the upload in the Data Schema section of the importer.
Step 2: Remove the first row or the Header row that contains the data schema before you upload.
Contact Support if you need help verifying data before you upload or if you run into errors after uploading.