The Eduphoria Active Directory (AD) Synchronization feature allows districts to synchronize accounts from Active Directory to Eduphoria automatically.
Districts can optionally configure the feature to:
Automatically create and delete accounts.
Update email and name information.
Manage locations.
Before you begin with the setup process, we recommend reviewing the integration document. It will help you understand exactly how the feature functions.
Caution: On the first synchronization, the system sends a welcome email to all newly created users. The welcome email contains a link for users to create a password. This email is not be sent if the district has successfully set up Active Directory Remote Authentication, SAML, or ClassLink prior to setting up the AD User Sync Tool.
Enabling Directory Services Integration
Follow the steps below to set up the synchronization feature.
Step 1: Log into Eduphoria as a system administrator.
Step 1: Log in to Eduphoria and select Management.
.png)
Step 2: From the main menu, select the Security Settings gear icon.

Step 3: From the resulting drop-down menu, choose Directory Services and Student Sign-On.
.png)
Step 4: Go to the User Syncing tab.
Step 5: Select the Enable Microsoft Active Directory integration checkbox to enable the entire synchronization feature.
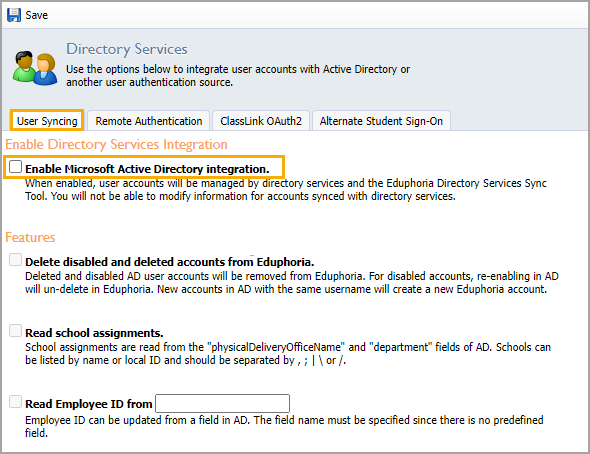
Once enabled, districts can select optional features to delete Eduphoria accounts, update school and location information, and synchronize employee IDs.
If the Read Employee ID checkbox is selected, the Employee ID field in Active Directory must be specified. Populate this field with the true Active Directory name, not the user-friendly name. For example, the field should read “PhysicalDeliveryOfficeName” instead of “office.”
Step 6: Once all desired options are selected, select Save.
Eduphoria Directory Services Sync Tool Requirements
After enabling the synchronization feature and selecting the various options, the local synchronization tool can be installed and configured.
For the Eduphoria Directory Services Sync Tool to operate successfully, you must meet the following minimum requirements:
Installation on a computer in the local network’s domain.
A 64-bit Windows Operating System.
The tool polls Active Directory and synchronizes with Eduphoria. For additional configurations, review Active Directory User Syncing Integration.
Configuring the AD User Sync Tool
Follow the steps below to download, install, and configure the AD User Sync Tool.
Step 1: Download the AD User Sync Tool.
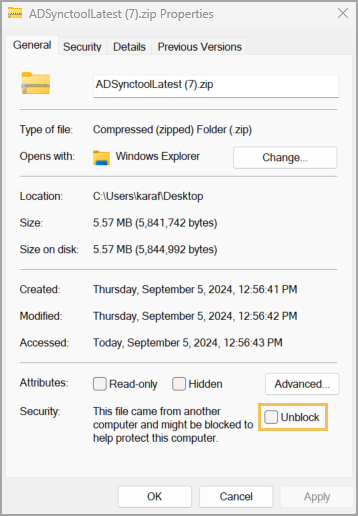
Step 2: Right-click the installer and select Properties. Under the General tab, select the Unblock checkbox and click Apply.
Step 3: Launch the installer and follow the onscreen instructions.
Note: If you have already downloaded the Active Directory Remote Authentication tool, you do not need to download the AD User Sync Tool. They are packaged together.
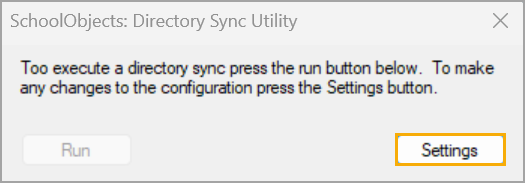
Once installed, a new icon will appear on the desktop for the SchoolObjects Directory Sync tool. Launching this tool opens a small application with two options: Run and Settings.
Step 4: Use the Settings button to set up the process before running any synchronizations.
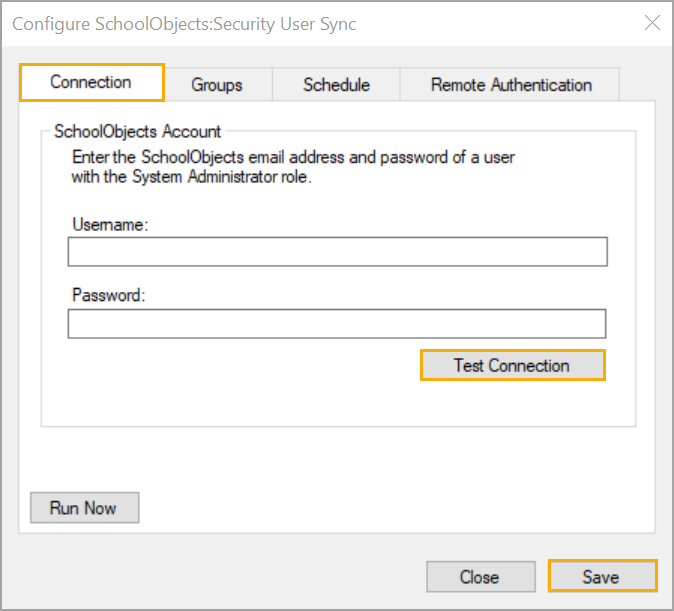
Step 5: Establish the user credentials to connect to Eduphoria under the Connection tab. This user account must have System Administrator access.
Enter the username and password, select Save, and then select Test Connection. After confirming a proper connection, select Save again.
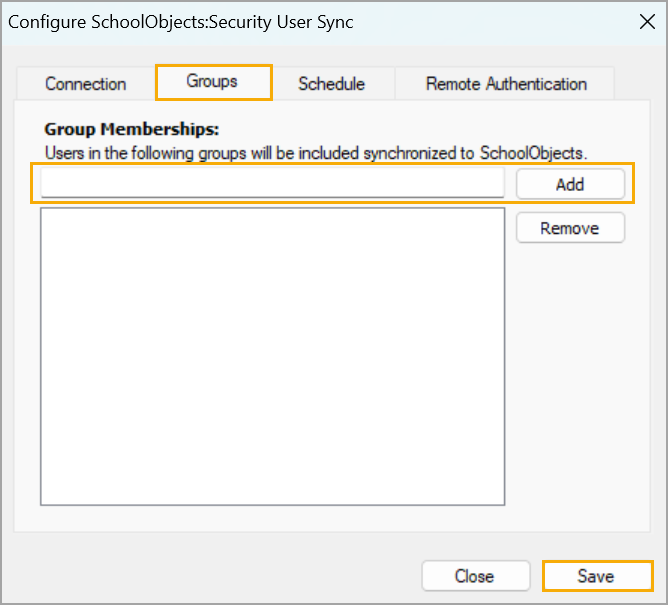
Step 6: Establish which security groups to include in the synchronization under the Groups tab.
Type the group name, then select Add. To correct any input mistakes, click the erroneous group and select Remove. After establishing your security groups, select Save.
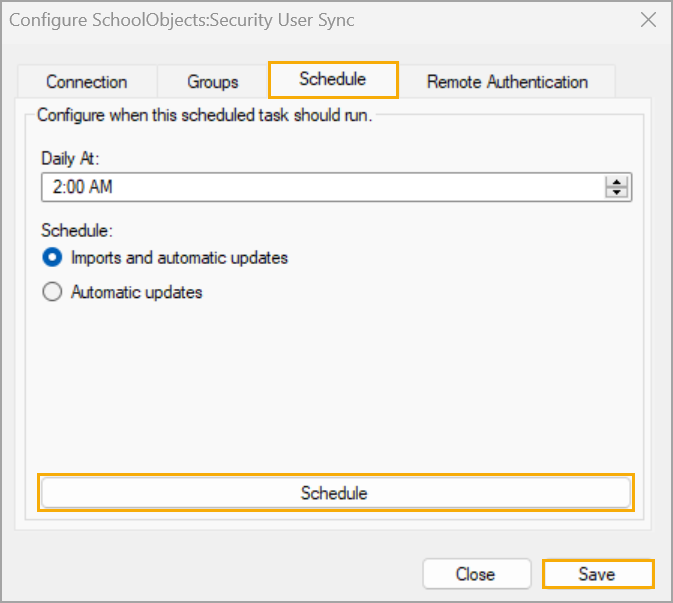
Step 7: Configure when specific tasks should run daily under the Schedule tab.
Select the time for the task to start. Then, establish the task from the following options:
Imports and automatic updates.
Automatic updates.
Select Schedule. When you are done scheduling tasks, select Save.
The First Synchronization
Caution: On the first synchronization, the system sends a welcome email to all newly created users. The welcome email contains a link for users to create a password. This email is not be sent if the district has successfully set up Active Directory Remote Authentication, SAML, or ClassLink prior to setting up the AD User Sync Tool.
Once you have configured Management options and the AD User Sync Tool, you can run the first synchronization. Since the first run may cause more than 5% changes due to account information updating, you need to run the process manually.
Select the Run Now option under any of the Settings tabs.
ORSelect Run on the initial screen of the local tool.
This shows the changes as they occur.
After the process is complete, system administrators in Eduphoria receive an email about the status. A list of changes appears, including all users created, deleted, or updated. Selecting any user displays the user’s name, email address, Active Directory GUID, type of change, and the user’s internal Eduphoria User ID.
If all changes look acceptable, click Apply Changes. This starts the actual synchronization process with Eduphoria.
If there appears to be erroneous changes, you can Cancel the process. This makes the initial synchronization safe to perform, as you are required to approve the changes.
Remember that the synchronization will fail if more than 5% of users are modified in the scheduled process. The system will send a summary email informing system administrators of the failure and informing you that a manual process must be completed if those changes should be committed.