Once a mastery tracker is populated with multiple assessments, teachers with a rostered course and users with an approved Student Access List can utilize the various data views to understand a student’s mastery level.
Users can calculate Mastery by using either district-defined thresholds or by teachers manually determining mastery levels based on data collected and anecdotal information. Teacher-set mastery levels override calculated determinations.
Mastery can be set at three different levels for each individual standard. The default labels are Limited, Mastered, and Exceeded, but a user with the Configure Settings right can change these mastery labels as appropriate for district needs. Ideally, teachers or local administrators should determine what constitutes each level of mastery before getting started to obtain consistent results.
.png)
Setting Mastery Levels
Teachers can manually set a student’s mastery level and reassess that level as the student’s performance changes over time. The teacher’s perception of mastery should be based on the latest raw data available for each standard. Alternatively, teachers can select Calculate Mastery to automatically assign mastery levels based on the district’s set thresholds.
A dot () appears on the top right corner of any mastery level that a teacher or other user has manually set, which is also indicated with the legend for User Set Mastery.
Quick Guide
Select the Mastery column to open a drop-down menu.
Determine which mastery level to assign the student or select Clear Mastery () to remove it.
For mastery levels you don’t want to manually set, select Calculate Mastery () to have the system assign levels for you based on your district’s Mastery Thresholds.
Illustrated Guide
Step 1: Select the Mastery column to open a drop-down menu.
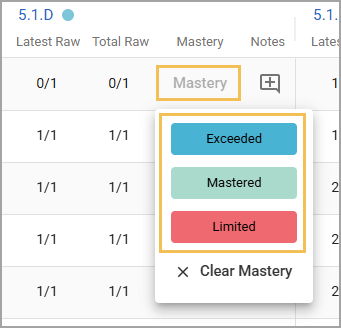
Step 2: Determine which mastery level to assign the student or select Clear Mastery () to remove it. Once a teacher inputs a mastery level, that level persists in mastery data views until the teacher changes or clears it.
Caution: Changing or clearing a mastery level in any view also affects all other views showing mastery. For instance, changing a student’s mastery level in the Student Summary View also changes it in the Student View, the Standard View, and the Assessment View. Moreover, Mastery Distribution in the Mastery Overview is affected.
Step 3: For mastery levels you don’t want to manually set, select Calculate Mastery () to have the system assign levels for you based on your district’s Mastery Thresholds. Selecting Calculate Mastery only sets unassigned levels and does not override any that are manually set.
.png)
Teachers should review their mastery perceptions for any standard associated with a newly added test. They can view and change each mastery level in any data view that shows a standard’s mastery level.
Notes
Notes are an additional function that teachers can use to leave comments or descriptions. For instance, a teacher might want to explain why they set a mastery level for a specific learning standard. Clicking on the Notes icon () opens the Notes for that mastery level.
.png)
Notes can be up to 1000 characters in length and can be seen and edited in any view that has a mastery level, whether calculated or teacher-set.
Caution: Clearing or resetting mastery levels does not delete content users have written in Notes (), preserving data in case clearing mastery levels was done in error. Users might need to edit their Notes if they set different mastery levels than before.
Teacher View for Mastery Thresholds
Teachers can see their district’s Mastery Threshold settings as long as they have access to their tracker.
Quick Guide
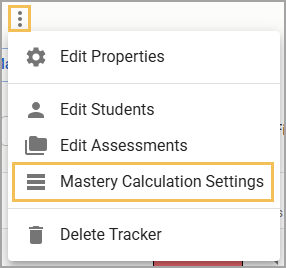
Select the three vertical dots (), and then select Mastery Calculation Settings ().
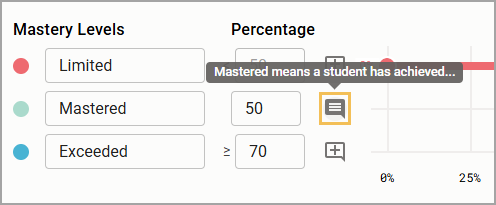
Review the mastery levels, percentages, and descriptions, if any are given. Hover over the Notes icon () or select it to read a mastery level’s description.
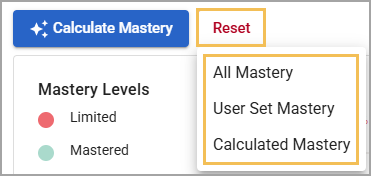
If needed, you can populate mastery levels automatically by selecting Calculate Mastery (). Selecting Reset allows you to clear mastery all mastery levels, user-set mastery levels, or calculated mastery levels.
Illustrated Guide
Step 1: Select the three vertical dots (), and then select Mastery Calculation Settings ().
Step 2: Review the mastery levels, percentages, and descriptions, if any are given. Here, you can see the last time mastery was calculated and when the last threshold change occurred.
.png)
Hover over the Notes icon () or select it to read a mastery level’s description.
Step 3: If needed, you can populate mastery levels automatically by selecting Calculate Mastery (). Alternatively, selecting Reset allows you to clear mastery levels based on the following options:
All Mastery
User Set Mastery
Calculated Mastery
Caution: Once you reset mastery levels, you cannot undo it. You must manually set mastery levels or allow the system to automatically calculate them again.