Formspace Data and Print Options
The Data & Printing tab allows you to define your data fields and also add a Word document as a print option for this form. By using a mail merge within Microsoft Word, you can print the form data to any format desired.
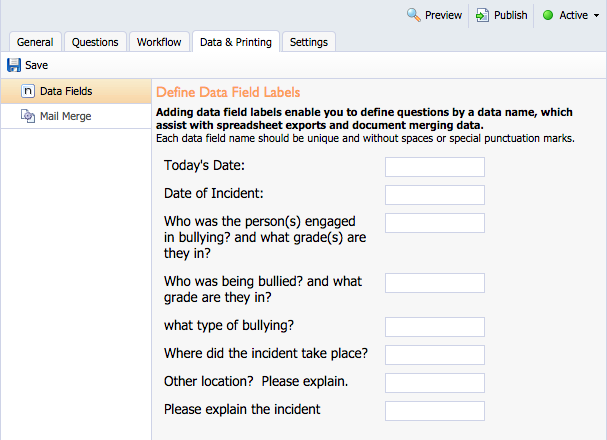
Data Fields
The interface shows a blank field for each question on your form. By default all Excel dumps use the question title as the column header. You can't type in desired column headers or field names here. These field names are also used when doing a mail merge with Word. Click Save after making any changes.
Mail Merge
The screen allow you to generate a header file for the mail merge. Simply click Download Header File to save a text file with the specified fields that you need. This file can then be imported into Word using the mail merge tools. Be sure to place these fields into the Word document where desired. You do not have to use every field.
Once created and populated with the appropriate fields, upload your Word document (.doc) using the Upload Document Template option.
Caution: You must use a .doc file extension for Mail Merge. The .docx file extension will not work.
You can upload multiple documents as needed. Each one appears as a separate option on the Reports tab. Use the blue arrows to reorder the documents as desired. The red X removes unwanted documents from the list.
.png)
To export data from submitted/completed forms to your uploaded Mail Merge Document, go to your Reports tab.
View a VIDEO on how to use Mail Merge in Formspace
Here is a summary of the steps involved in Mail Merge process:
Create Form (Questions and Workflow) > Publish.
Data & Printing tab > Data Fields.
These are headings in a spreadsheet.
Type fields with no spaces or punctuation marks.
Save.
Data & Printing tab > Mail Merge.
Download Header File and save to desktop or drive.
Create Word document.
Mailings tab > Select Recipients > Use existing list > upload the text file downloaded from Formspace (may differ is using various versions of MS Word).
Insert fields in Word document where text from form will appear.
Save Word document and close.
Data & Printing tab > Mail Merge.
Upload Document Template.
Title the template, and be specific.
Save.
Mail Merge.
Once data has been submitted in a form in Formspace, go to the Reports tab.
Form Analysis > Select Form.
Adjust dates to include the first day forms were submitted that you want to include in the mail merge and the final day plus one for forms submitted you want to mail merge. (See video above.)
Add additional filters if needed.
Print Option > Select Mail Merge document template.
Word document will open.
Formspace Settings Tab
Merging Forms – Merges all currently published questions into existing forms. This can add additional questions, change existing questions, or delete active questions. Deleting or changing active questions can result in data loss.
Importing Questions – Allows form creators to import questions from pre-existing forms including entire documents.
Clearing Document Responses – Erases all form data from all active documents. This cannot be undone!
Save Points – Provides a snapshot of the form versions as they are created and published. Use this list to restore previous versions of a document.
Electronic Signatures – Requires the form to be electronically signed by the requestor and each approver in the workflow. Recipients of the form do not have to sign the form electronically. This setting is an "all or nothing" setting per form. The ability to pick and choose who will and won't sign the specific form does not exist.
Allow Recall After Completion – Allows a form submitter to recall the form after the form has completed the workflow process in order to add additional information to the form. An example would be a discipline form submitted by a teacher on a student. The form can be recalled after the first offense so the teacher can add a second offense to the form. And then the same form can be recalled after the second offense to add a third offense to the form. That way administrators can see the cumulative list of all offenses and disciplinary actions assigned to a specific student on one form.
Additional Management and Reporting Users – Allows form creators to add users who can analyze the form data and/or edit the form questions, workflow(s), etc.
.png)