The Upload Test Files option in the Analysis Settings () allows Aware administrators to upload state and national test data. Using the DAT files from state CDs and other sources, districts can upload external test data. Before uploading a test file, review our current list of supported file types.
You can also check the status of imported files done through Secure File Transfer Protocol (SFTP).
Uploading a Test File
Quick Guide
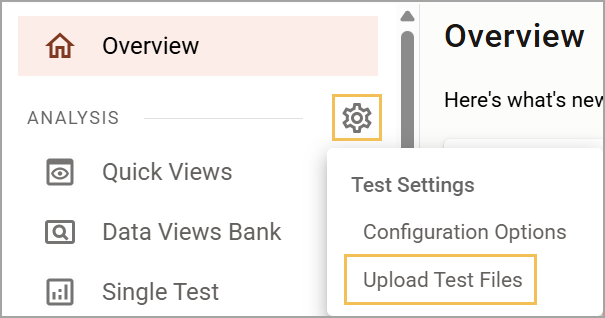
Select Upload Test Files under the Analysis Settings gear ().
On the Pending Files tab, click the Choose File button to search your device for a file to upload.
Confirm the name of the selected file and then click the Upload button.
Illustrated Guide
Step 1: Select Upload Test Files under the Analysis Settings gear ().
Note: You must have the Import Test Files right to access Upload Test Files. If you do not see this option in Analysis Settings (), please contact your IT team or Eduphoria System Administrator.
Step 2: On the Pending Files tab, click the Choose File button to search your device for a file to upload.
.png)
Step 3: Confirm the name of the selected file and then click the Upload button.
.png)
Files selected for upload automatically appear on the Pending Files tab. You can add multiple files to the pending files upload queue.
Note: Depending on the size of the file, the upload process may take some time. Please wait while the upload is in progress.
Once the importer finishes, files disappear from the Pending Files tab. To view the status and other details of the file import, click on the History tab. Once the imports are successfully completed, they will have a green checkmark.
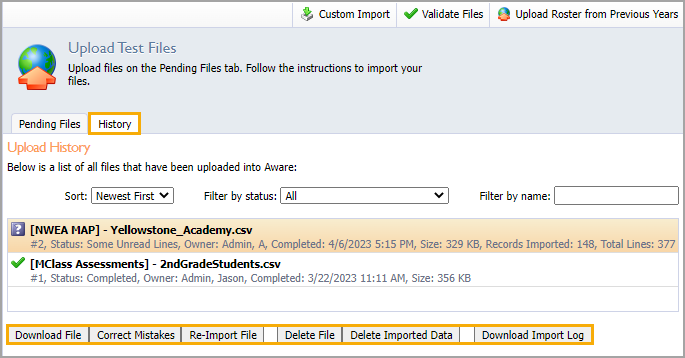
Note: File history entries that end with an asterisk indicate that the file was imported using the latest version of our importer.
Importing Test Files With SFTP
Test file imports via SFTP should be in the same format as the files you receive from assessment vendors such as the TEA, College Board, and others.
Note: Importing test files via SFTP is only supported with built-in test types. Custom test types are not supported at this time.
You can automate SFTP test imports and view their uploads in your import history under Aware > Analysis Settings (settings) > Upload Test Files > History tab. Visit Access Keys to learn how to connect your SFTP client to run test file imports.
State Test Files
As new state test file formats and new data from those files become available, the Eduphoria development team updates the importer schema to support the new data. Sometimes, districts will need to re-import files to display updated data for analysis.
To re-import a test file, select a file on the History tab, then click the Re-Import File button.
.png)