Managing schools and departments is a requirement for utilizing licenses across the district. Return to these selections when new purchases are made, such as a new lead4ward or Strive license, a new campus opens, or modifications are needed. To access this page, a user must have the Manage Schools right. Reach out to your local district administrator for more information about this access.

This section of the management tool allows you to create all your schools and departments. The number of schools created needs to match the number of licenses purchased by the district. If a district has purchased 5 licenses and then creates 6 schools, the system will only allow you to select up to 5 checks for each individual application. If you check the 6th, it will go back and uncheck a license from a previously selected school. You either need to change the 6th to a department or purchase an additional license.
You can create as many departments as you like. Departments do not count toward campus licenses. Departments are perfect for groups like Special Education, Technology, Food & Nutrition, Maintenance, etc. Members of departments will not have access to use the lesson planner in Forethought; however, they can still be curriculum managers. Departments inherit the applications that schools have turned on, and they do not have students associated with them in the way school licenses are associated.
Creating Schools and Departments
Step 1: Log in to Eduphoria and select Management.
.png)
Step 2: From the main menu, select the Organization Settings gear icon.

Step 3: From the resulting drop-down menu, select Create New School to start the New School wizard.
.png)
Step 4: Enter a Name for the school or department. Then, select Next and Finish.
.png)
Step 5: Select Schools from the main menu and then select your school or department from the list.
.png)
Step 6: Complete the following fields on the General tab:
Verify that the Name is correct.
Enter the Local ID Number, State ID Number, and College Board ID Number, if applicable. These fields are necessary for using Aware. Make sure the Local and State ID Number fields match those corresponding numbers in your Student Information System.
Select a School Contact.
Select a Principal if you are creating a school or Manager for a department.
Select the Current Reporting Year to use.
In the School Type section, determine whether this is a School or Department.
Hours of Operation impact when rooms and assets can be reserved during school hours and outside of school hours in Facilities&Events. Helpdesk can also be impacted by ticket time statistics calculated based on hours of operation.
.png)
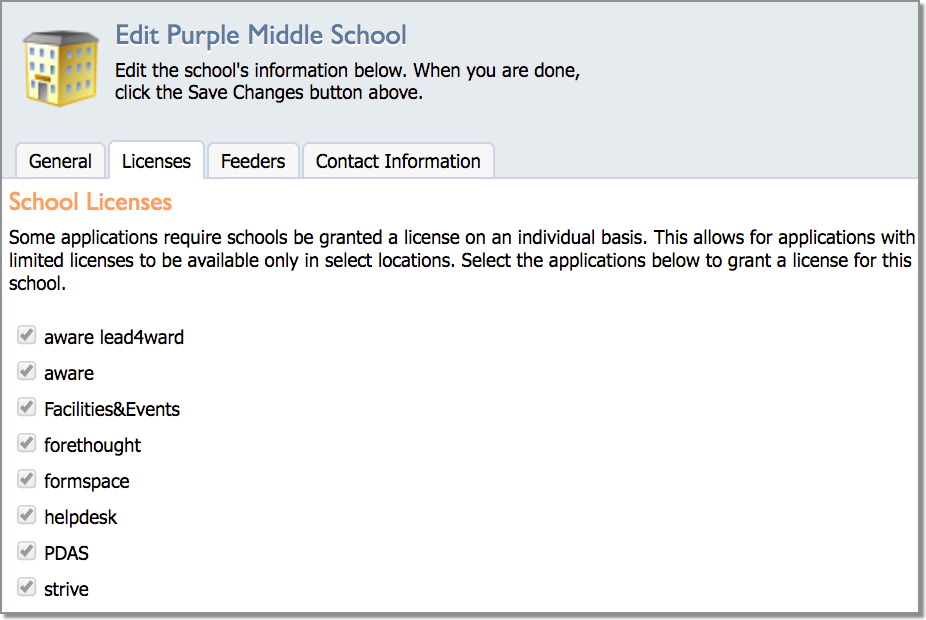
Step 7: (Optional) If you are creating a school, select the Licenses tab and then select the checkboxes for the applications that the school will use to activate their licenses.
.png)
Step 8: (Optional) If you are creating a school, select the Feeders tab and then select the checkboxes to note which schools feed into the new school.
.png)
Step 9: (Optional) On the Contact Information tab, enter the address and phone/fax numbers for the school or department.
.png)
Step 10: Click Save at the top to finalize all settings.
.png)
Managing Licenses
For schools only, the Licenses tab shows all purchased applications. When you are ready to turn on the application(s) for users, select the checkbox(es) and click Save. Repeat for additional schools.
You do not need to turn on licenses for departments because they don’t require licenses.
If an application is not selected for a specific campus, staff members at that school cannot access that application.
Merging and Closing Schools and Departments
Warning: If your district closes a school, do not delete that school from Management.
During the summer months, many districts merge or close schools. If your district closes a school, do not delete that school from system management since deleting a school impacts school-level Where They Were (WTW) and Where They Are (WTA) data in Aware. Instead, remove all licenses from that school, move all users from that school to another school, and rename the school by adding a "z" or "Closed" to the beginning of the school name so it is obvious that the school is no longer open.
When merging schools, consider which State ID number will remain in use.
For the school with the State ID that will no longer be used, remove all licenses from that school and add a "z" or "Closed" to the school name to designate that the school is closed.
Example: Rename the school to zHappy Elementary School if the school name currently appears as Happy Elementary School in Management. Historic data from the closed school will now be associated with zHappy Elementary School.
For the school with the State ID you are keeping and using, rename the school in Management to reflect the new name of the school.
Example: Rename the merged school to Happy Intermediate School in Management if that is the new name being used by the district for the two combined schools. Historic data from the school with the State ID you keep will now be associated with Happy Intermediate School.