Editing your schedule in Forethought helps you match your planner to the courses you are teaching during the grading term. You can use as many schedules as you need. Each schedule contains course entries and special entries (preps), such as notes, planning period information, or sub-notes. Your lesson planner can be changed to fit any changes in the year’s schedule.
Note: Editing your schedule does not remove your lesson plans from the previous grading period.
Quick Guide
On the My Planner tab, select Change My Settings from the Planner Options section of the left panel and then select My Schedules.
Select the schedule you want to edit and then click Edit Schedule.
If desired, you can change the name of the schedule in the Schedule Title field. Click Next to continue.
The Add Entries to the Schedule step allows you to add, edit, remove, and reorder the courses in your schedule as needed.
Click Next to continue.
Select Begin Using Forethought to exit the wizard.
Illustrated Guide
Step 1: On the My Planner tab, select Change My Settings from the Planner Options section of the left panel and then select My Schedules.
.png)
Step 2: Select the schedule you want to edit and then click Edit Schedule.
Note: If you want to create an entirely new schedule, it might be best to click Remove Schedule to remove last year's schedule and then Add a Schedule. Removing last year’s schedule does not erase or modify information from last year.
.png)
Step 3: On the Create a Schedule step, you can change the name of the schedule by editing the name in the Schedule Title field. Click Next to continue to the next step.
.png)
Step 4: The Add Entries to the Schedule step allows you to add, edit, remove, and reorder the courses in your schedule. When finished with this step, click Next to continue.
.png)
Adding an Entry
On the Add Entries to Schedule step, select Add an Entry.
Select A Course with Learning Standards and select Next.
Drill down through the Course Tree to select the course standards for the new entry and then select Next.
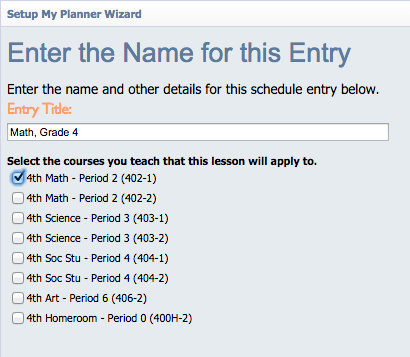
Renaming the entry on the screen is optional, but it is recommended that the name be tied to the learning standards for the entry.
Note: If your district is using Aware and your district roster is up to date, you can select the courses matched to the entry. If you do not see your courses for the new term listed, the roster update has not been completed.
Editing the Title of an Entry
On the Add Entries to Schedule step, select an entry and then click Edit Entry.
Edit the Entry Title as needed and then click Next.
Removing an Entry from Your Planner
On the Add Entries to Schedule step, select an entry and then click Remove Entry. The entry is removed from the My Schedule list. Removing an entry from your schedule does not erase or modify information already in your planner.
Changing the Order of Entries in Your Planner
On the Add Entries to Schedule step, select an entry and then use the Move Up and/or Move Down buttons to set the order you want to see in your planner.
Step 5: Select Begin Using Forethought to exit the wizard.
For Aware Customers Only
Select the course from your Master Schedule to connect test data of students to your entries in Forethought. You can select multiple classes to connect to an entry. For example, if you teach three preps of math, check all the math classes that use that course’s curriculum. This will allow teachers access to the TEST tab from Aware to create and manage teacher tests.