The Remote Roster Tool securely transmits your roster data to the Eduphoria servers. This transfer relies on properly formatted data exports from your Student Information System (SIS), like Skyward, eSchoolPlus, or PowerSchool.
The Remote Roster Tool Version 3 update will allow Aware users to see more detailed demographics information, including Migrant, Homeless, Emergent Bilingual/English Learner, ESL, and LEP statuses.
Note: The Remote Roster Tool is only compatible with Windows. We currently do not offer support for Mac.
Requirements for the Remote Roster Tool
Eduphoria’s Remote Roster Tool requires a Windows PC that meets the following minimum requirements:
Supported version of Windows Server (must be 64x)
4GB of RAM or greater
At least 20GB of free hard drive space
Microsoft .NET Framework 4.5
We have broken down the setup process for the Remote Roster Tool Version 3 into four key areas:
Preparation
File Preparation
To prepare for the data transfer, your first step should be preparing the data export files, which are created through an automated process in your SIS. The entire export process will run automatically every night and generates four TXT or CSV files corresponding to the layout required for your SIS. For help configuring these exports, contact your SIS vendor.
User Account Preparation
Follow the steps below to prepare your user account for the transfer of your roster data. You will create or confirm an admin account that will only be used for this data transfer.
Step 1: Log in to Management.

Step 2: From the main menu, select Users.
.png)
Step 3: In the Users list, search for “roster admin”.

If the account does not exist, create the account. If the account exists, but you are unsure of the password, you can reset the password on the General tab of the user profile.
Step 4: On the Roles tab of the user profile, select System Administrator.
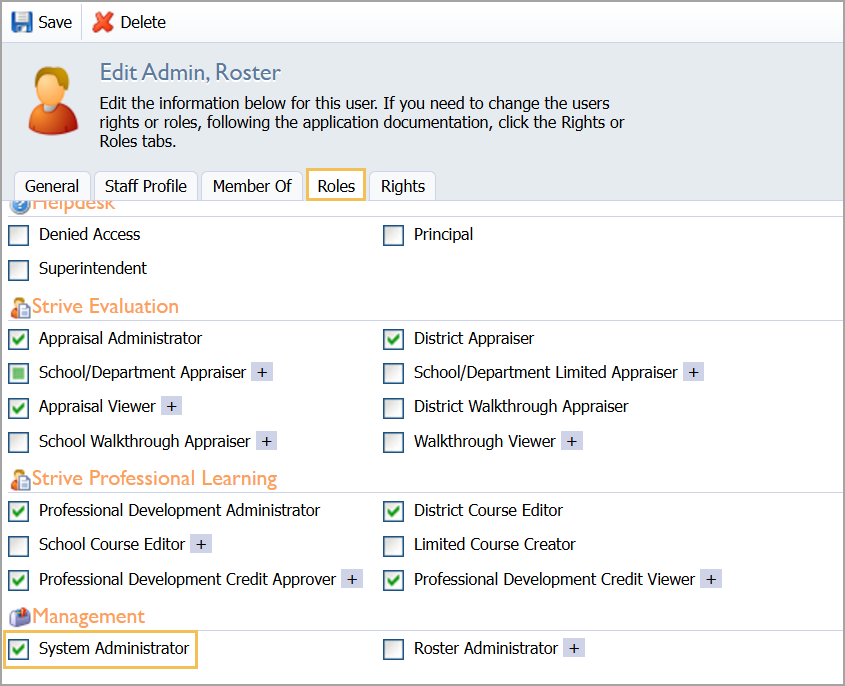
Step 5: Click the Save button.
Warning: Never use a user account that is tied to an actual person at your district. To maintain the data transfer process, use only the dedicated "roster admin" account's username and password.
The automated process produces a nightly status email that sends a summary of recent changes to the roster to all roster administrators. Only provide this role to the appropriate staff members.
Installation
Downloading and Running the Installer
Note: If your district’s rosters are hosted by your Education Service Center, you do not need to download the Remote Roster Tool.
Step 1: Download the installer.
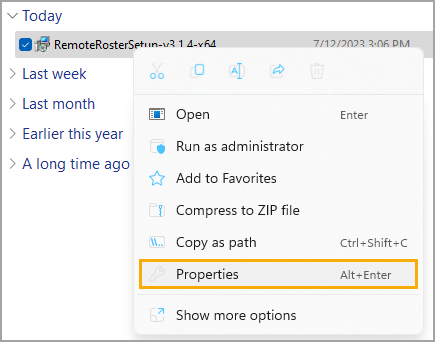
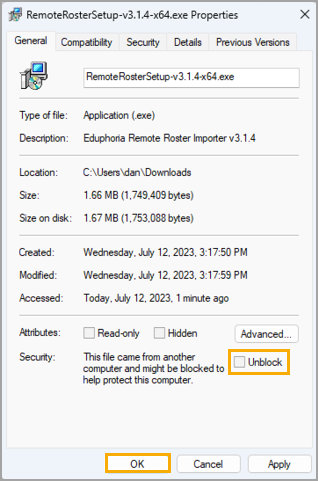
Troubleshooting Tip: In some cases, Windows users may block the installer from running. To unblock the installer, right-click the downloaded file and select Properties. Check Unblock, and select OK.
Step 2: Run the installer and follow any pop-up prompts to complete the installation.
Note: Prior to running the installer, be sure to uninstall the previous version of the Remote Roster Importer using the Add or remove programs tool on your device.
.png)
Configuration
These next steps instruct you on how to retain and use past configurations if you are reinstalling the Remote Roster Tool. If you cannot save any prior configurations or are new installers of the Remote Roster Tool, you can skip down to Configuring Server Settings for the First Time.
Retaining Past Configurations
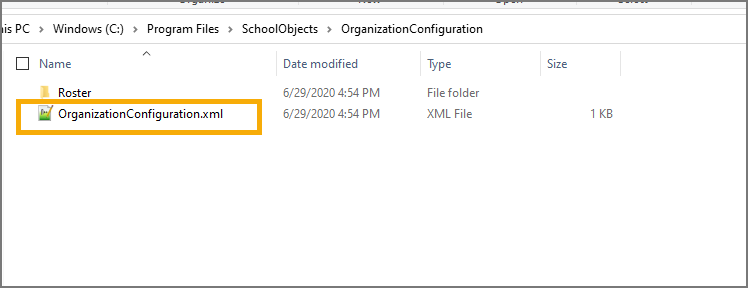
Step 1: To save your preferences and properties, navigate to the School Objects folder of your computer's Program Files, then select the Organization Configuration folder.
Step 2: Copy the XML file to a temporary place. You will use it to replace the new, blank file that is generated with the new installation of the roster tool.
Server Settings Tab
Establish the connection to your Eduphoria server on the Server Settings tab.
Step 1: Open the Eduphoria Remote Roster Configuration icon on your desktop.
Step 2: Enter the username (email address) and password for the System Administrator account from User Account Preparation.
Step 3: Click Save.
Step 4: Click the Test Connection button to ensure the settings are correct.
If the connection fails, ensure your details are entered correctly, then update the password for the admin account and try again.
.png)
You may now replace the newly generated XML file with the backup of the original you saved during File Preparation.
Schedule Tab
The Remote Roster Tool performs daily roster file uploads to Eduphoria, which is set up as a scheduled task to automate the process. The setup and any necessary maintenance of the scheduled task is performed by the district.
Step 1: On the Schedule tab, set a time between 9:00 PM and 1:00 AM to run the import without conflicts.
The Schedule tab is only relevant for creating the scheduled task initially. Once you’ve created the task, you can update and manage the scheduled time within Windows Task Scheduler.
Step 2: If you see a space for it, enter a username and password for an account on the server that has access to create the scheduled task within Windows Task Scheduler.
Step 3: Click Schedule Import to create the scheduled task.
If there is an error, then the account used does not have access to create the scheduled task, or the username and password are not correct. Troubleshoot these problems, then try again.
.png)
SIS Settings Tab
The SIS Settings tab is where you select the files from your SIS to be imported into Eduphoria.
Step 1: On the SIS Settings tab, select your SIS in the drop-down menu.
Step 2: Click the Browse button to find the SIS export files you prepared or located in the Preparation section of this guide.
Step 3: Click Save.
.png)
Operation
Starting a Manual Import
Step 1: On the Server Settings tab, click Run Now to start a manual import.
The Run Now button will initiate the first import of these files and will email a status report to the Eduphoria users with the roster administrator role.
The Send Files button only re-sends the last processed data set. It does not reprocess files stored in the file location set under the SIS Settings tab, so do not use this button to create a new manual import.
.png)
SIS File Formats
Don’t see your SIS? You can manually configure your export to match one of the above file formats based on the one that is easiest for your district to match on. Commonly, districts will match either Skyward or Ascender (TxEIS).
You must manually configure the export to match one of the above mentioned file formats.
