Form Management allows appraisal administrators to build and edit forms used in educator evaluations and data analysis. Users can locate Form Management by accessing Settings () in Strive. This article provides an overview of tasks and features users can harness with Form Management.
.png)
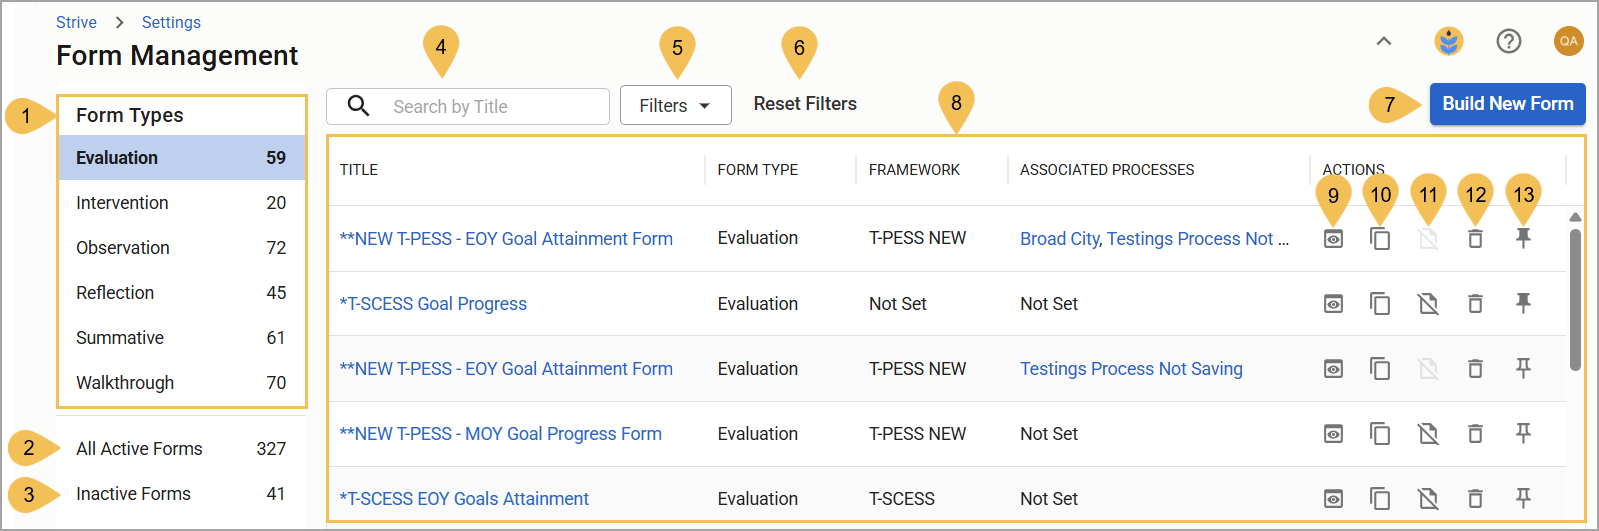
Form Management Screen
On the Form Management screen, you can browse a list of form types, filter a list of forms, make forms inactive, preview and delete forms, and more.
# | Field | Description |
|---|---|---|
1 | Form Types | Shows Strive’s built-in form types (Evaluation, Intervention, Observation, Reflection, Summative, and Walkthrough) and the number of forms you have built for each type. Selecting any form type updates the Forms List to display information for that type. |
2 | All Active Forms | Shows the number of active forms. Selecting All Active Forms updates the Forms List to include all active forms, regardless of type. |
3 | Inactive Forms | Shows the number of inactive forms. Selecting Inactive Forms updates the Forms list to only include inactive forms, regardless of type. |
4 | Search by Title | Filters the list to show forms with titles that contain the search criteria you entered in the field. |
5 | Filters | Allows you to set specific filters to narrow the list of forms. For any selected form type, you can filter by framework and associated evaluation processes. If the list is showing all active or inactive forms, you can also filter by form type. |
6 | Reset Filters | Clears all filters. |
7 | Build New Form | Selecting the button opens the New Form Setup modal, where you can set the new form’s title, type, framework, and a few optional fields. Visit Building a New Form for the Evaluation Process to learn more. |
8 | Forms List | Displays a list of forms based on your current selections, including information such as their titles, form type, framework, associated processes, and actions you can take for the form. Selecting a form’s title directs you to the form builder, where you can review and edit the form’s content. Clicking a form’s associated process takes you to that process's builder screen. |
9 | Preview () | Preview how the form appears for users within Strive. Within the preview, you can also copy, edit, or print the form. If the form isn’t currently assigned to a process, you can make it inactive. |
10 | Copy () | Makes a copy of the form that retains all settings and items from the original. You can then retitle and fully edit the copied form. |
11 | Make Inactive / Make Active () | Moves the form to the Inactive Forms section, preventing it from being added to evaluation processes. An inactive form is also removed from report selections, though the system retains historical data for analysis. Analysis options, such as Document Summary and Detailed Analysis, allow you to include inactive forms in reporting by toggling on Show Inactive Forms. If the Make Inactive icon is grayed out, that means the form is currently associated with a process and cannot be made inactive. To make it inactive, remove it from all processes first. When viewing your inactive forms, select Make Active () on any form you want moved to the active lists and to use in various Strive processes. |
12 | Delete () | Removes the form permanently after user confirmation. Once committed to, this action cannot be undone. |
13 | Pin () / Unpin () | Pin up to five forms to the top of the list for each form type. The system automatically arranges your forms in alphabetical order, regardless of which order you pin them. In addition, pinning behavior will persist in Document Summary’s drop-down menus. You can unpin a form at any time. The option to pin forms is not available for All Active Forms and Inactive Forms. |
New Form Setup
When you create a new form, you must complete two setup modals before finalizing creation.

# | Field | Description |
|---|---|---|
1 | Form Title | Names the form. This is a required step of the form creation process. |
2 | Form Type | Assigns a type to the form (Evaluation, Intervention, Observation, Reflection, Summative, or Walkthrough). This is a required step of the form creation process. |
3 | Framework | Assigns the form to a framework provided by your district or no framework. This is a required step of the form creation process. |
4 | Start and End Time | Adds the field to the form header. Checking the box for Start and End Time makes it mandatory for the form creator to complete. |
5 | Grade Level | Adds the field to the form header. Checking the box for Grade Level makes it mandatory for the form creator to complete. |
6 | Subject | Adds the field to the form header. Checking the box for Subject makes it mandatory for the document creator to complete. |
7 | Default Duration (Minutes) | Shows the duration of a form’s primary action, like an Observation or Walkthrough, in minutes if the Start and End Time box is checked. The form creator can adjust the duration in minutes. |
8 | Additional Information Text Box | Adds the field to the form header. Checking the box for Grade Level makes it mandatory for the form creator to complete. |
9 | Cancel | Ends the process without creating a form. |
10 | Next | Goes to the second part of the New Form Setup process. |
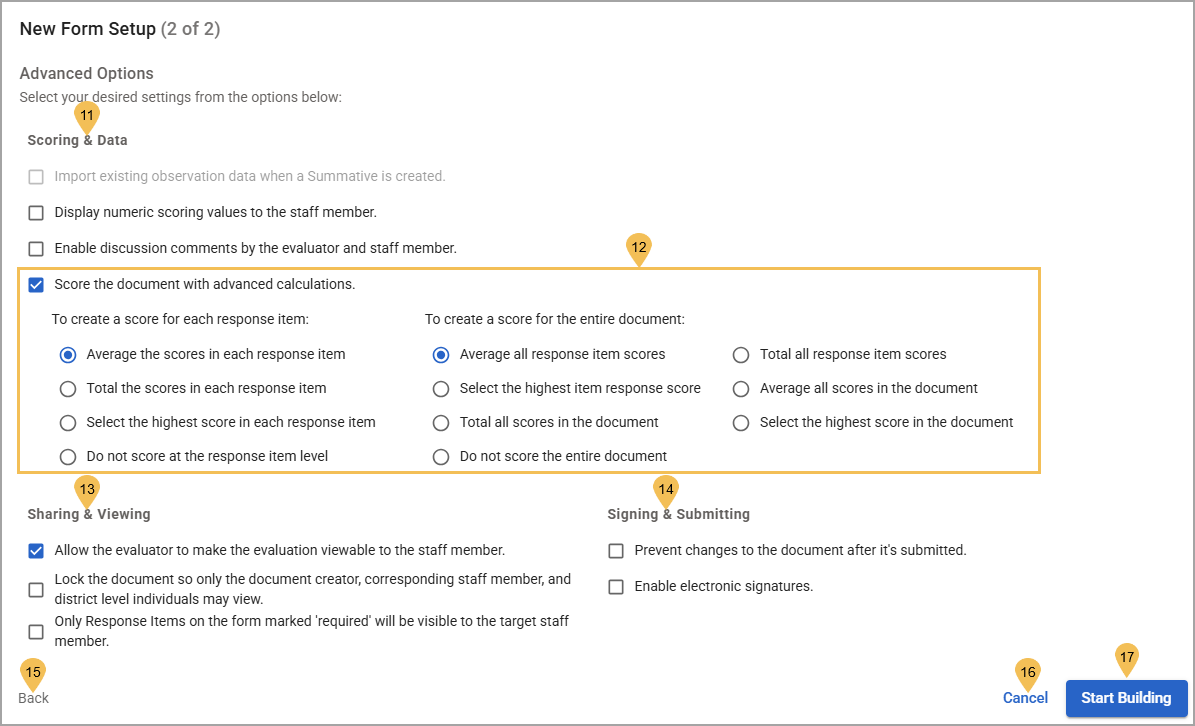
11 | Scoring & Data | Allows for the selection of the following advanced scoring and data options:
|
12 | Score the document with advanced calculations | Allows for the selection of scoring with advanced calculations for each response item and the entire document. Choose one of the following to create a score for each response item:
Then, choose from the following to create a score for the entire document:
|
13 | Sharing & Viewing | Allows for the selection of the following advanced sharing and viewing options:
|
14 | Signing & Submitting | Allows for the selection of the following advanced signing and submitting options:
|
15 | Back | Returns to the first part of the New Setup Form process. |
16 | Cancel | Ends the process without creating a form. |
17 | Start Building | Creates the form with all of your current settings selected and redirects you to the Form Builder screen. |
Form Builder Screen
Once you’ve finished assigning settings to the form, you can add content to the form on the Form Builder screen.
.png)
# | Field | Description |
|---|---|---|
1 | Advanced Options () | Opens the Advanced Options modal, allowing you to edit your form selections for scoring and data, sharing and viewing, and signing and submitting. |
2 | Preview () | Shows a preview of how the form appears to a user. You can also print the form in this view or close the view. |
3 | Delete () | Permanently deletes the form after user confirmation. |
4 | Autosave Indicator () | Consistently updates its icon as a user makes changes to the form, indicating whether their work has been automatically saved or not. |
5 | Close | Closes the current form and redirects users to the Form Management screen. |
6 | Form Header Details | Displays the required form details filled out and selected during form creation. |
7 | Edit Form Header Details () | Opens the Edit Form Header Details modal, allowing you to modify required and optional fields. |
8 | Expand () / Collapse Header () | Shows or hides the optional fields in the header that a form creator must complete. |
9 | Form Items | Lists the items that a form creator can use to build content for the form. Items are split into Informational Items (Section, Text, and Goal) and Response Items (Text Response, Matrix Response, and Selection Response). Drag and drop the items into the form and fill out their necessary details. For more information, see Form Items. |
10 | Add to form () | Adds the item to the form. If there are currently items on the form, selecting this button adds a new item to the bottom of the form, which can then be dragged and dropped to a new position. |