
Users with the Manage Custom Item Banks right can access and perform a variety of actions from the Custom Item Banks screen. This article provides a brief description of these actions and links to additional articles where you can find a detailed walkthrough of the process.
.png)
Importing Additional Items
You can add more items to an existing custom bank with a QTI package by selecting the Add plus sign icon in the Actions column of the Custom Item Banks list. Then, follow the prompts to upload your file.
The validation process checks that the file is in a valid format. Once confirmed, the import process begins. Importing items, especially for large item banks, takes time, so the import goes to a queue and continues to run asynchronously in the background, allowing you to leave the page and come back later to check on the import’s progress.
Note: The system can upload up to five files at a time with a maximum file size of 20MB each. QTI packages must be in their original format with a top-level immsmanifest.xml file. Do not extract the individual QTI packages before importing them. If your ZIP file contains multiple QTI packages, do extract them to separate the individual QTI packages before uploading.
For detailed instructions, see Importing Additional Items into a Custom Item Bank.
Reviewing Items
It is important to review questions, resources, and prebuilt tests after each import to ensure the validity of each item before it is used in an assessment. On the Custom Item Banks screen, select the item bank to review. Select the Questions, Resources, or Prebuits tab and then select the Item ID to open the preview window.
For detailed instructions, see Reviewing Questions, Resources, and Prebuilt Tests.
Caution: If a package includes external links to resources (audio, video, images, etc.) as part of the question, the links will not work with LockDown Browser. Please review items imported from a QTI package prior to delivering assessments.
Caution: Some item types can be rendered by our software, but we do not support the ability to edit those items. Examples include but are not limited to polygonal hot spot shapes and drag-and-drop items to images.
Deleting Items and Banks
Deleting an item removes it from the custom item bank. However, the item continues to exist in any assessments that use it and in new assessments that are created by copying assessments that contain the item. Once deleted, the item cannot be used again from the custom item bank.
For detailed instructions, see Deleting Items and Banks.
Troubleshooting Imports
Items that do not follow the QTI specifications, or follow a custom formatting in the XML code, are not supported. If you are not sure what specifications the items follow, you can contact the vendor that provided the items to find additional information.
Any items that fail the import process are identified in the Import Log. For more information, see Troubleshooting and FAQ
You can download the error log for an import, so it can be reviewed or shared. Due to the amount of variability that each QTI package could potentially have, it is not possible for Eduphoria to make modifications to support individual items that fail to import.
Please note that some item types, such as polygonal hot spot shapes, can be rendered by our software, but cannot be edited in Eduphoria.
Managing Access to Items and Prebuilt Assessments from Shared Item Banks
Shared item banks are banks that are managed by Eduphoria or a partner. These banks have shared access provided to all customers or by a license that is purchased with an item bank. Some of these shared banks may include prebuilt assessments. An example would be Bluebonnet Assessments.
To manage access to the prebuilt assessments from shared custom banks, select the Edit Properties gear icon () in the Actions column for the item bank.
.png)
You can customize the Access Permissions to determine at which levels individuals can use the bank to author assessments. If setting permissions for prebuilt assessment usage, if you select District, then prebuilt assessments from this package will only be visible to district-level administrators.
.png)
Adding or Modifying Standards in a Custom Item Bank
Typically, standards are attached to items using information from the QTI package. However, some packages provided by a vendor do not include standards for every item, or possibly no items at all. Items that do not have a standard attached to them will not surface when searching for items from a bank in the Author or Questions and Resources screens in Aware. You can resolve this by manually assigning standards to items that did not import with a standard.
Please note that standards must be included with the QTI import to automatically be connected. If standards were not matched to items, then it is most likely because the standards were not included in the QTI package. Please work with the vendor that provided the QTI packages if standards are missing.
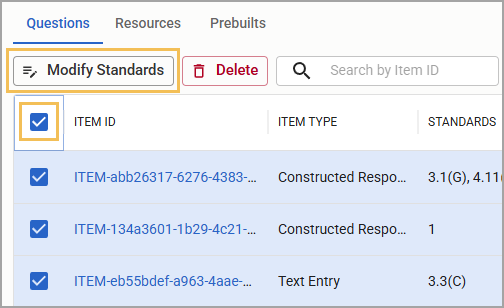
To manage the standard for an item in a custom item bank, select the Name of the custom item bank on the Custom Item Banks screen to review the items. Locate the item you want to edit and then select the Modify Standards icon in the Actions column.
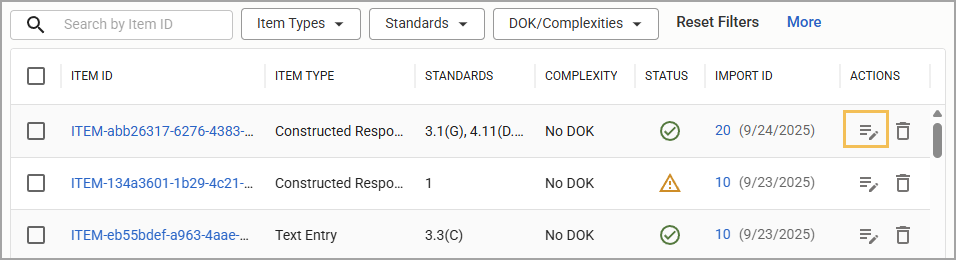
You can manage standards for multiple items by selecting the checkboxes for each item and then selecting the Modify Standards button that appears above the table.
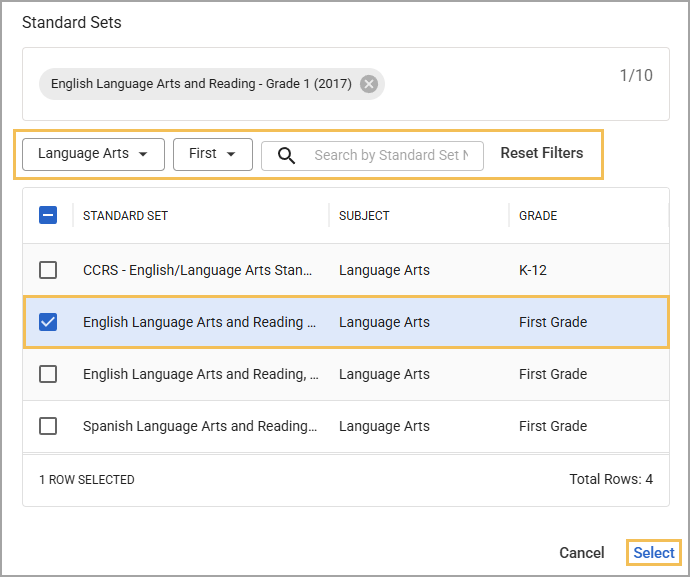
In the Standard Sets window, select the Subject and Grade Level to filter the standards list, use the Search bar to locate specific standard sets, or select Reset Filters to clear all filters. Then choose one or more standard sets to apply. Selected standard sets appear in the box at the top of the window. Click Select to continue to the next step.
You can now select an individual standard to apply to the item. When you click Update, all items that you selected receive the selected standard.
.png)
Finding Items from a Custom Bank
Items added to Aware via a custom item bank import can be found in the Questions & Resources section or by searching for items while authoring an assessment in Author.
Questions & Resources
In Questions & Resources, find the course you’ve uploaded items to in the course selection tree. Select either All Standards or the standard you want to view.
From the Choose Item Banks drop-down, select Custom Banks and then use the filters to narrow down your search. You can click on an item to open a preview.
Note: You cannot edit items directly from the custom item bank. However, you can edit the item from an assessment once it has been added.
.png)
Author
Begin authoring an assessment as usual. When adding an item, choose Search Item Bank. Select either All Standards or the specific standard you want to view.
.png)
From the Choose Item Banks drop-down, select Custom Banks and then use the filters to narrow down your search.
.png)
Select an item to add to the test and then click Add to Test in the Question Cart.
.png)
Once added to the test, you can edit the item as needed. As a reminder, items imported into a custom item bank might have limited editing functionality. For some item types, this limitation is put in place to avoid accidentally breaking items that can potentially mess up online testing for students.