This article’s steps are specific to setting up the T-PESS process for principals. You should follow the same steps to set up a separate process for assistant principals. The principal and assistant principal evaluation processes both use the same framework, steps, and tasks, but some of the templates associated with the tasks are different.
Note: Eduphoria provides locked templates that help ensure data fidelity and simplify using templates from the Eduphoria Community. The current templates include T-TESS Alt D1, T-TESS v2, T-PESS v2, and T-SCESS.
T-PESS v2 is a renamed version of the T-PESS rubric which took effect in August of 2021. If your district previously used Eduphoria’s locked T-PESS NEW framework, it has been renamed to T-PESS v2 and is ready to use. All the settings in your evaluation process and templates are automatically updated to T-PESS v2; you don’t need to make any changes.
If you have previously used a T-PESS framework other than Eduphoria’s locked T-PESS NEW framework, a framework created by your district, or if you have not used Strive for your T-PESS process, you must create a new appraisee type and evaluation process tied to the T-PESS v2 locked framework.
Retiring Your Existing T-PESS Appraisee Type
If you are creating a new Appraisee Type because you need to update to the T-PESS v2 framework, retire any old or unused Appraisee Types. Rename all old Appraisee Types before setting up a T-PESS process. For example, you could add “z_old_” to the beginning of a title to make the title drop to the bottom of the list or indicate it should not be used: z_old T-PESS Principal - DO NOT USE.
Warning: Do not delete appraisee types from your system. Deleting an appraisee type deletes all data connected to that appraisee type.
Creating the Evaluation Process With the T-PESS v2 Framework
Quick Guides
Gathering Templates From the Eduphoria Community
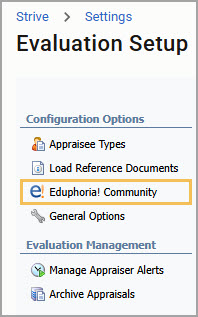
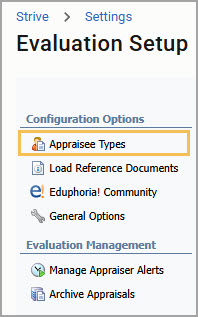
Select Settings to access Evaluation Setup. Then, under Configuration Options, select Eduphoria! Community.
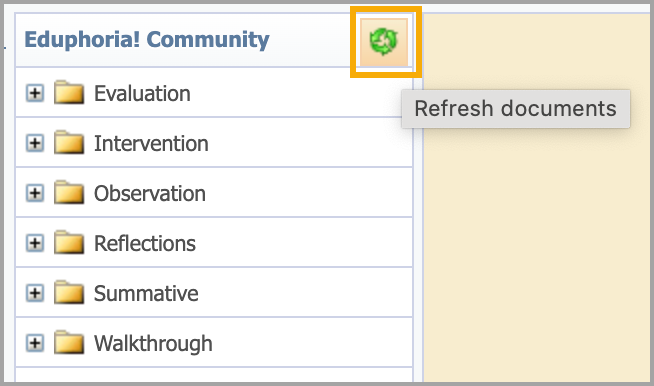
Click the Refresh documents button (circle of green arrows) to ensure you have the most up-to-date options.
See the table in the illustrated guide for a list of templates to download.
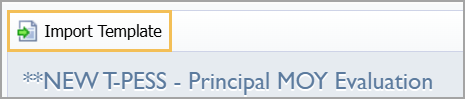
Select Import Template to download each template.
Access your downloaded templates within their respective form types under Settings > Form Management.
Creating a New T-PESS Principal Appraisee Type
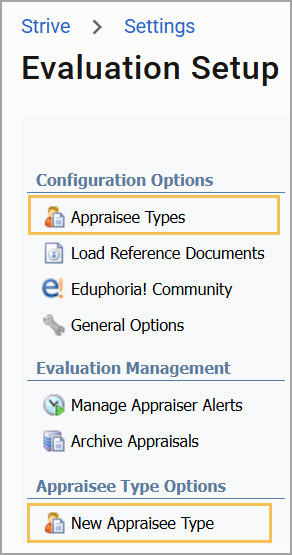
Go to Settings > Evaluation Setup > Appraisee Types. Then, in the Appraisee Type Options section that appears in the menu, select New Appraisee Type.
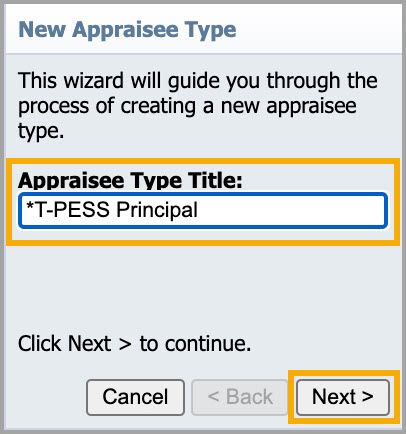
Type “T-PESS Principal” in the Appraisee Type Title box, and click Next.
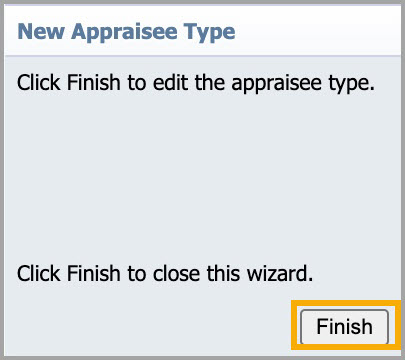
Click Finish to close the wizard. Repeat this process to create the “T-PESS Assistant Principal” Appraisee Type.
Setting up a T-PESS Evaluation Process
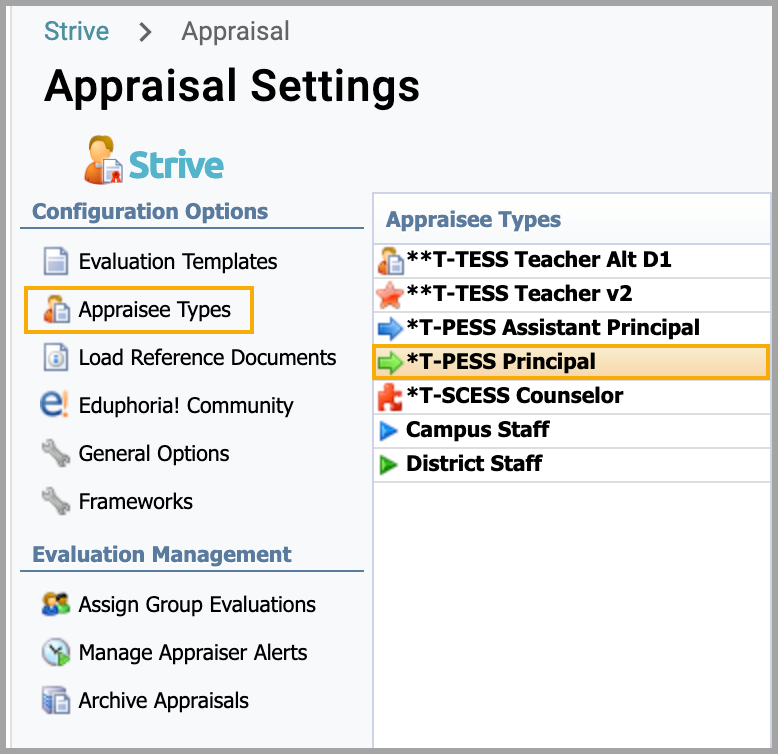
Go to Settings > Evaluation Setup > Appraisee Types.
Select T-PESS Principal under Appraisee Types.
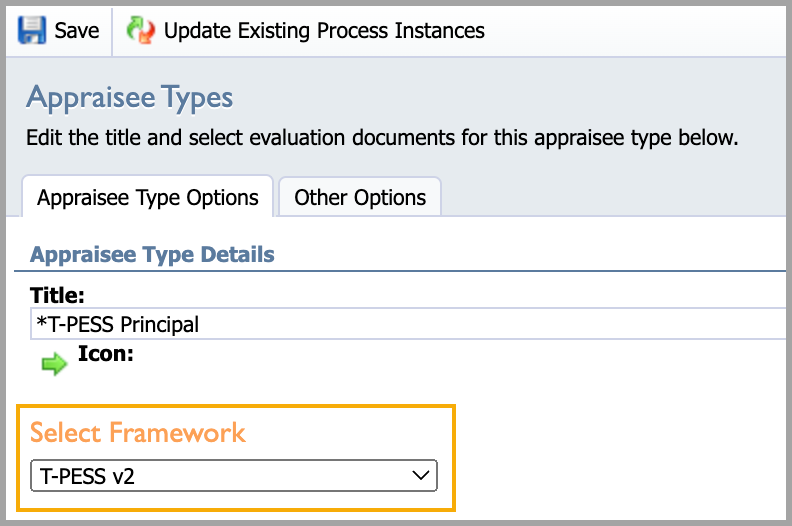
Select the drop-down menu under Select Framework and select T-PESS v2.
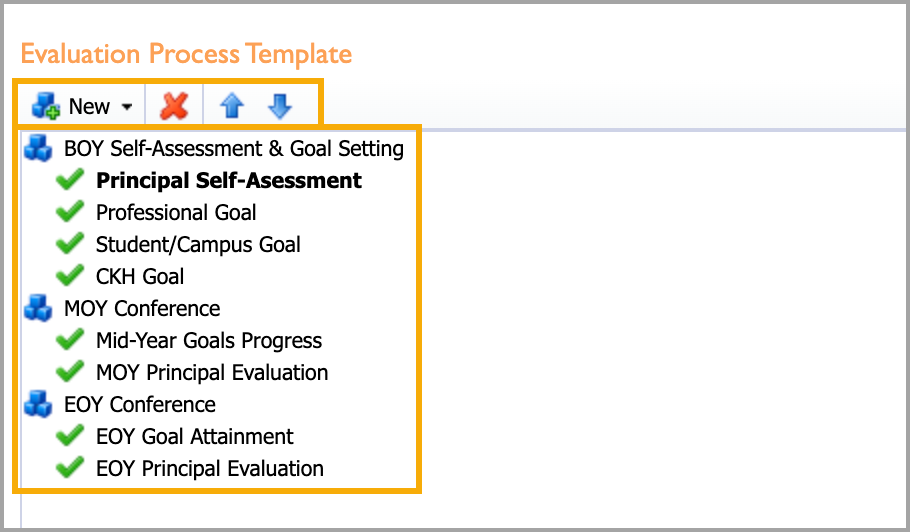
Set up the evaluation process by creating and modifying steps and tasks in the Evaluation Process Template.
Districts can customize their process.
Each task requires a task type.
Select documents or professional goals. Do not use student growth goals for T-PESS.
Select each task and assign a task type. With the exception of the Professional Goal and Student Goal, choose the document task type for each task.
For each task, select the appropriate template from those that you imported in Step 1 or created yourself. See the table in the illustrated guide. Update after attaching each template to its task.
Set the task type for the goals. For the Professional Goal and the Student/Campus Goal, select Professional Goal as the task type. Do not attach a template.
Caution: The Student Growth Goal task type is designed for teachers’ student growth goals and SLOs and is tied to a specific course and course TEKS. Do not use the Student Growth Goal task type for T-PESS Student/Campus goals.
Illustrated Guides
Gathering Templates From the Eduphoria Community
The list below shows the folder location and the template title in the Eduphoria Community. The list includes all the documents for both principals and assistant principals.
Step 1: Select Settings to access Evaluation Setup.
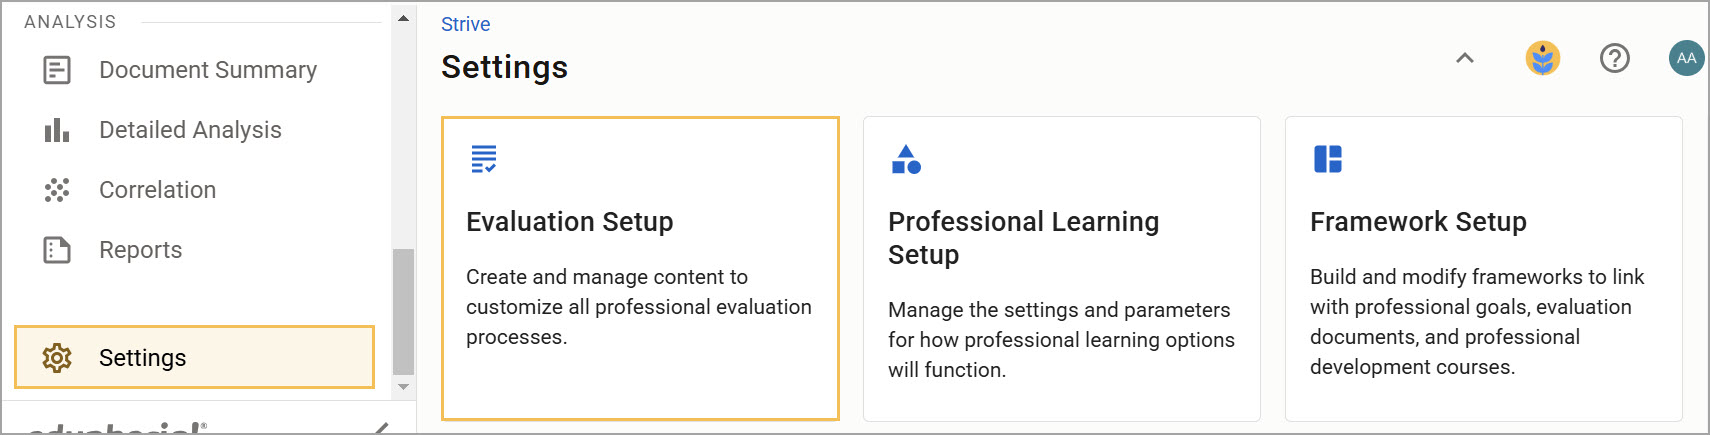
Then, under Configuration Options, select Eduphoria! Community.
Step 2: Click the Refresh documents button (circle of green arrows) to ensure you have the most up-to-date options.
Step 3: Download the following templates:
Folder | Template Title |
|---|---|
Reflections | **T-PESS - Assistant Principal - BOY Self-Assessment **T-PESS - Principal - BOY Self-Assessment |
Observations | **T-PESS - Assistant Principal - MOY Evaluation **T-PESS - Principal - MOY Evaluation |
Summative | **T-PESS - Assistant Principal - EOY Evaluation **T-PESS - Principal - EOY Evaluation |
Evaluations | **T-PESS - EOY Goals Attainment (for Principals & APs) **T-PESS - MOY Goal Progress (for Principals & APs) |
Note: Framework settings and tags are already set for templates imported from the community.
Step 4: Select Import Template to download each of the above templates.
Step 5: Access your downloaded templates within their respective form types under Settings > Form Management.
Creating a New T-PESS Principal Appraisee Type
After gathering the documents you need, you can create a T-PESS Principal Appraisee Type.
Step 1: Select Settings to access Evaluation Setup.
Under Configuration Options, select Appraisee Types to access the Appraisee Type Options section of the menu. Then, select New Appraisee Type.
Step 2: Type “T-PESS Principal” in the Appraisee Type Title box, and click Next.
Step 3: Click Finish to close the wizard. Repeat this process to create the “T-PESS Assistant Principal” Appraisee Type.
Setting up a T-PESS Evaluation Process
With a T-PESS Principal Appraisee Type prepared, you’re ready to set up a T-PESS evaluation process.
Step 1: Select Settings to access Evaluation Setup.
Then, under Configuration Options, select Appraisee Types.
Step 2: Select T-PESS Principal.
Step 3: Select the drop-down menu under Select Framework and select T-PESS v2.
Step 4: Set up the evaluation process by creating and modifying steps and tasks in the Evaluation Process Template.
Districts can customize their process.
Each task requires a task type.
Select documents or professional goals. Do not use the student growth goal task type for T-PESS. The student growth goal task type is designed for T-TESS.
Step 5: Select each task and assign a task type. With the exception of the Professional Goal and Student Goal, choose the document task type for each task.
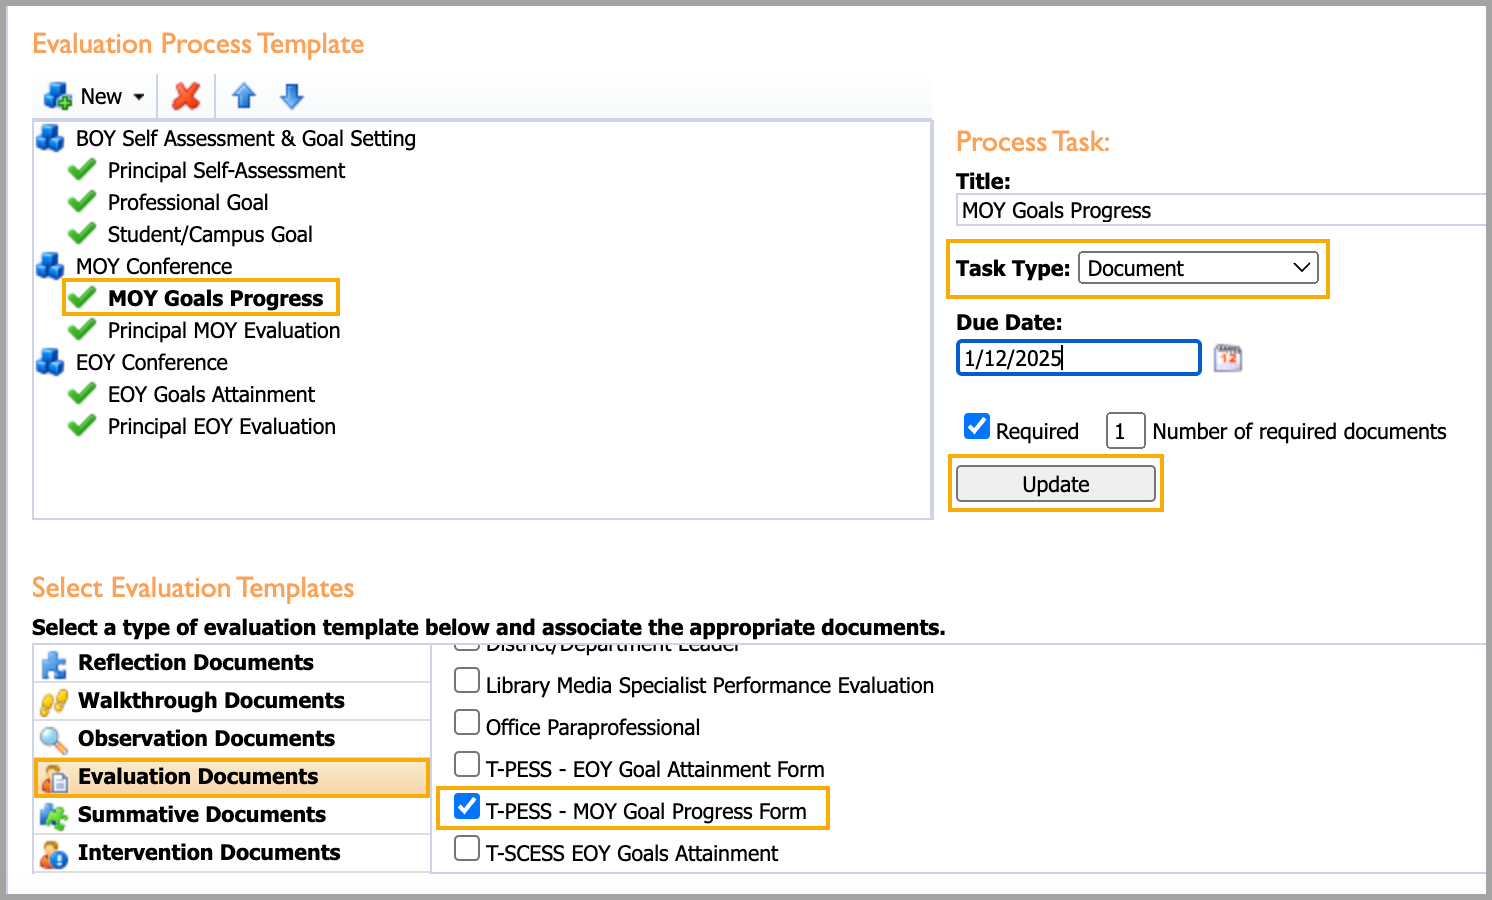
Step 6: For each task, select the appropriate template from those you imported at the beginning. After attaching each template to its task, select Update.
We have some recommendations for pairing tasks with their corresponding templates:
Principal Self Assessment > Reflection > **T-PESS - Principal - BOY Self-Assessment
Mid Year Goals Progress > Evaluation > **T-PESS - MOY Goals Progress
MOY Principal Evaluation > Observation > **T-PESS - Principal - MOY Evaluation
EOY Goal Attainment > Evaluation > **T-PESS - EOY Goals Attainment
EOY Principal Evaluation > Summative > **T-PESS - Principal - EOY Evaluation
Note: Use the template named T-PESS Assistant Principal to create that appraisee type. The MOY Goals Progress and EOY Goals Attainment templates are the same for both Principals and Assistant Principals.
Step 7: Set the task type for the goals. For the Professional Goal and the Student/Campus Goal, select Professional Goal as the task type and do not attach a template.
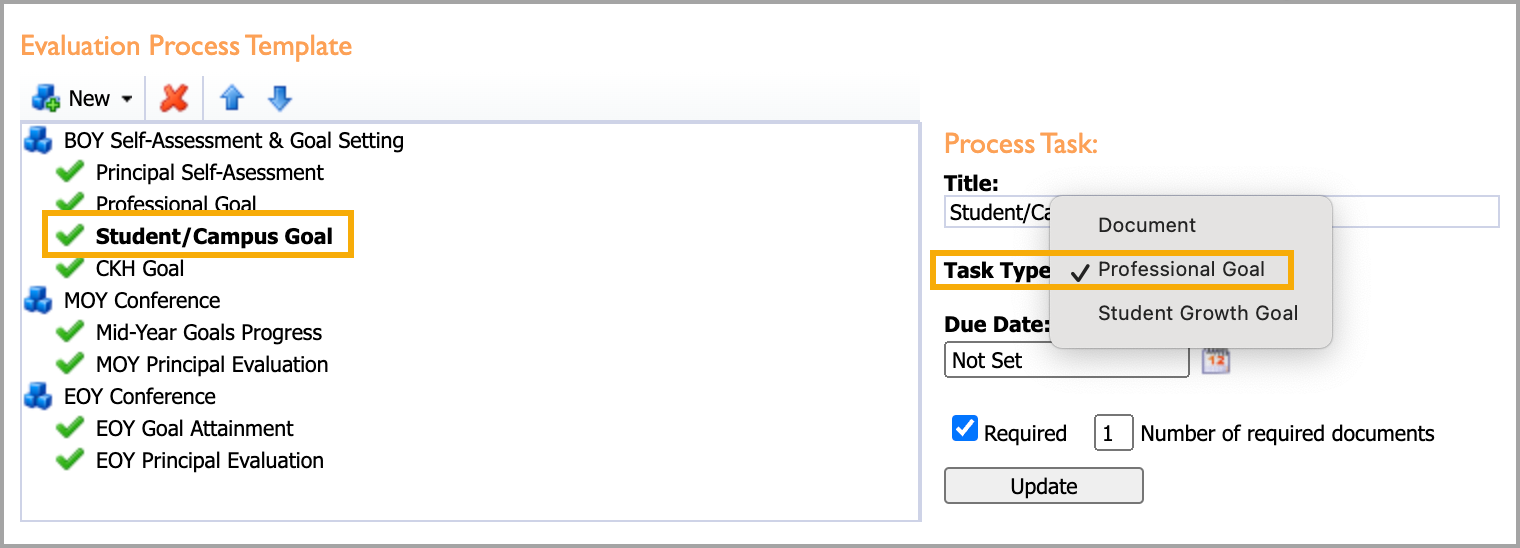
Caution: The Student Growth Goal task type is designed for teachers’ student growth goals and SLOs and is tied to a specific course and course TEKS. Do not use the Student Growth Goal task type for T-PESS Student/Campus goals.
Repeat these steps to build the T-PESS Assistant Principal process and connect those templates. Your appraisers must select the new appraisee type for all the T-PESS Appraisees.
Making Old Templates Inactive
Form Management contains all active templates and allows appraisal administrators to make active templates inactive. Making a template inactive moves the template to the Inactive Forms section and removes it from evaluation processes and report selections while maintaining historical data for analysis. In addition, you can make inactive forms active again.
Locate the old template under the appropriate form type, then select the Make Inactive icon.
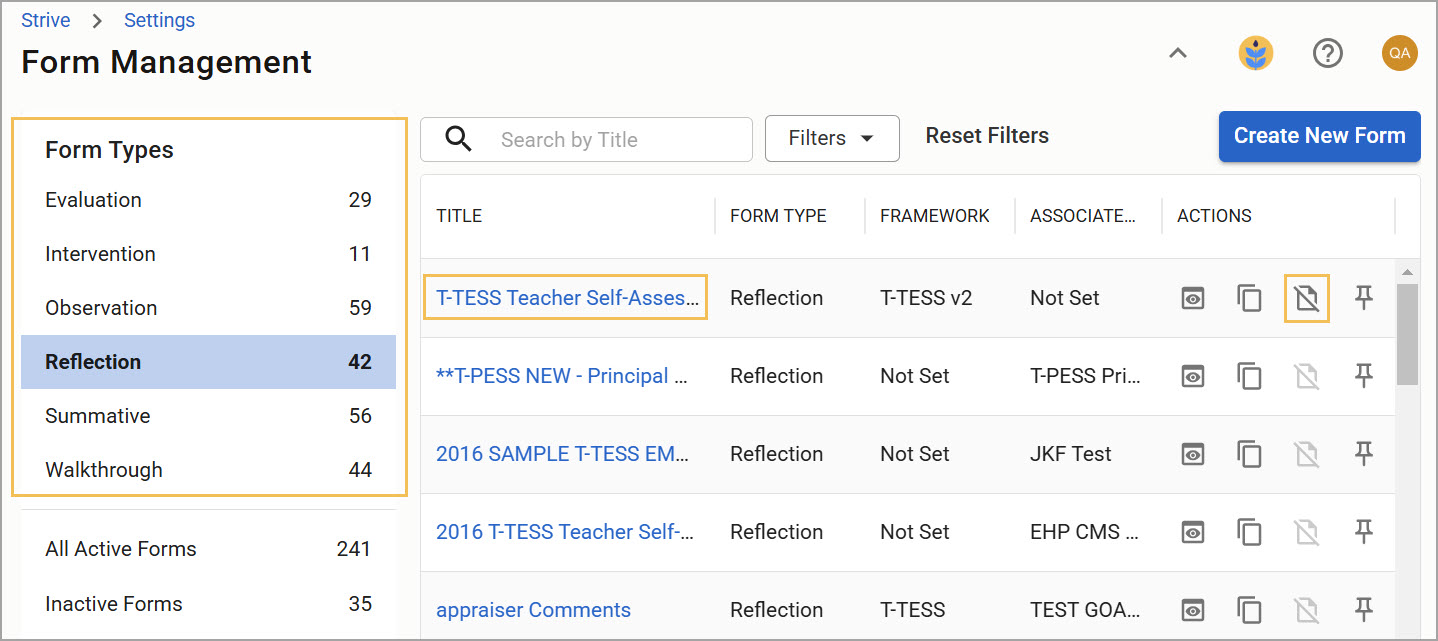
If the Make Inactive icon is grayed out, that means the template is currently associated with an evaluation process and cannot be made inactive.