Resources are supplemental or reference materials, such as videos, images, documents, or web links, that you can link to courses, units, or lessons.
Note: When you open a resource from the Relationships panel of a unit or lesson that is open in preview mode, the resource opens in the same preview window.
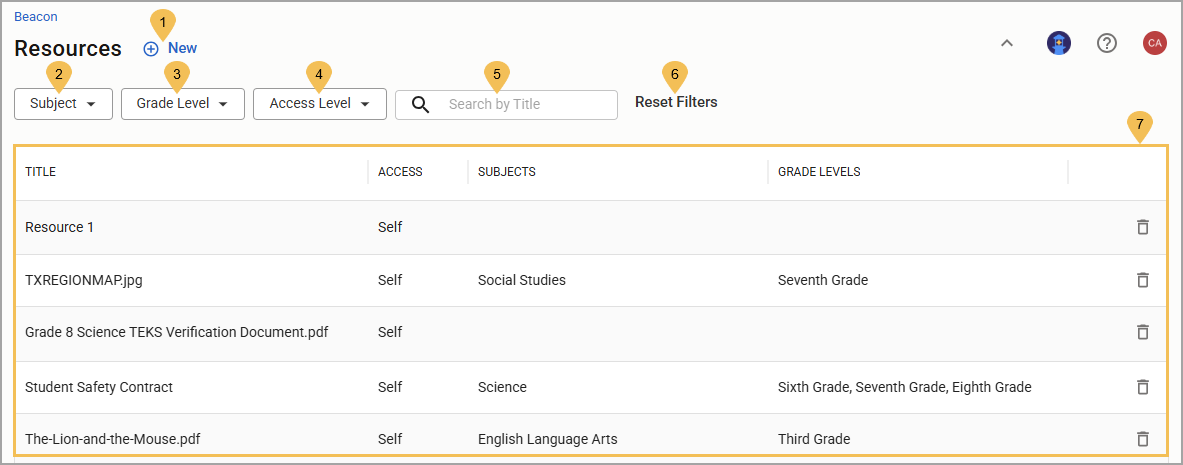
Resources List
The Resources screen allows you to quickly access resources by searching and filtering the list. By default, the list displays all of the resources that you have access to, including your own resources, those shared directly with you by other users, and those that are available to all users in the district.
You can also create or import new resources from this screen. Keep in mind that any resource created from Resources is not automatically linked to any other curriculum components. If you want to link the new resource to another curriculum component, such as an existing course or unit, you can do so manually from the Relationships panel of the existing curriculum component.
.png)
# | Field | Description |
|---|---|---|
1 | New | Opens a drop-down menu to create a new course using any of the following options:
|
2 | Subject | Filters the list to show resources that are tagged with the selected subject(s). |
3 | Grade Level | Filters the list to show resources that are tagged with the selected grade level(s). |
4 | Access Level | Filters the list to show either private resources or district-wide resources. |
5 | Search by Title | Filters the list to show resources with titles that contain the search criteria that you entered in the field. |
6 | Reset Filters | Clears all filters. |
7 | List | Displays all of the resources that you have access to, according to the applied filters. Columns include:
|
Hub
.png)
# | Field | Description |
|---|---|---|
1 | More Actions | Opens a drop-down menu that contains the following options:
|
2 | Share | Opens a window where you can view and edit current permissions, share with more users, or remove access for users who no longer need it. |
3 | Copy link in Course | Copies the URL of the resource preview to your clipboard, allowing you to share the link to the component in context of its parent course.
|
4 | Open in new tab | Opens the component as a new tab, allowing you to view the component in full screen rather than in preview.
|
5 | Close | Closes the preview.
|
6 | Editor / Attachment Viewer | When you select the Editor, you can edit a curriculum component document using the word processor’s text formatting options. When you select an imported file, the file appears in the Attachment Viewer. |
7 | View | Opens a drop-down menu where you can select the following views:
Select the Star icon to mark a file as the primary file. The primary file opens as the default when a user accesses the curriculum component. The Editor option exists by default and cannot be removed. |
8 | Relationships | Lists the standards and attachments that are linked to the curriculum component. Select the Add icon to link a new item. When you hover over an item in the list, the Unlink icon appears, allowing you to remove it if it was added accidentally or is no longer needed. The Info section of the Relationships panel displays the grade level and subject of the component, based on linked standards. For more information, see Using the Relationships Panel. |
Editor
The Editor is Beacon’s built-in word processor. You can use this handy tool to create documents such as templates, course syllabi, unit outlines, lessons, activities, and so on. To learn how to use features in the Editor, see Using the Editor.
.png)
Attachment Viewer
The Attachment Viewer shows any document you have uploaded as an attachment to the course. Select the file name from the View drop-down to open it in the left panel. The fields and controls available in the viewer depend on the file type. For an explanation of common icons, see Common Icons in Beacon.
.png)