Eduphoria districts can choose between two versions of the T-TESS framework: T-TESS v2 and T-TESS Alternate Domain 1 (Alt D1).
Note: This article walks you through setting up a T-TESS v2 evaluation process. When you are ready to conduct an evaluation, see Creating an Evaluation Document for staff.
T-TESS v2 Framework
Eduphoria offers the T-TESS v2 framework as an available T-TESS framework. This updated version has the same dimensions as the original T-TESS but has the added feature of being locked.
Locked frameworks increase data fidelity within and across districts and allow for more easily updated and shared forms. Eduphoria creates, updates, and supports forms tied to the locked T-TESS v2 and T-TESS Alt D1 frameworks.
Identifying Locked Frameworks
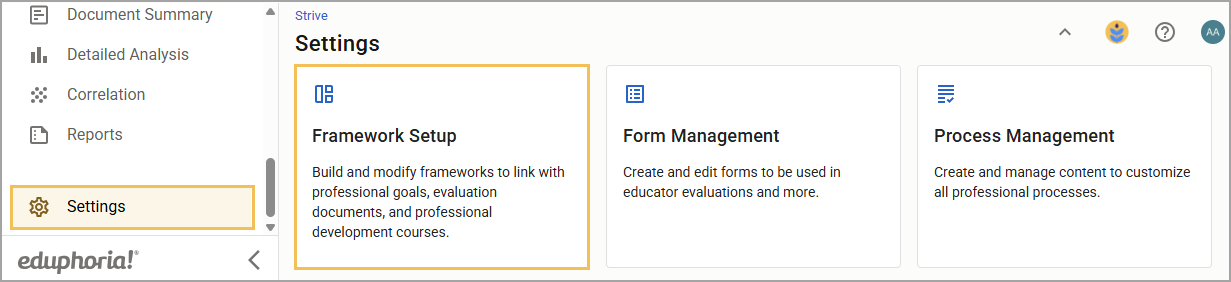
Appraisal managers can access locked frameworks by selecting Settings, then Framework Setup.
Locked frameworks are indicated with a Lock icon () and cannot be edited or deleted.
.png)
A locked version of the T-TESS framework called T-TESS v2 has the same dimensions as the original T-TESS. If your district selects this framework, we recommend creating a new evaluation process to help maintain access to historical data tied to the old framework. Learn more about building the evaluation process with the T-TESS v2 framework.
Note: Eduphoria recommends that you select one framework for all teachers so the data will not be split between two processes. Select Alt D1 only if you evaluate all of your teachers using the language of lesson internalization. If you have a mix, select the v2 framework and address lesson internalization by using the documents that have descriptors for both (see the table in Step 3 under Verifying Prebuilt Forms below).
Building the Evaluation Process With the T-TESS v2 Framework
If your district uses the locked T-TESS v2 framework, you must build a new evaluation process.
Retiring Your Existing T-TESS Process
The first series of steps requires you to retire your existing T-TESS process.
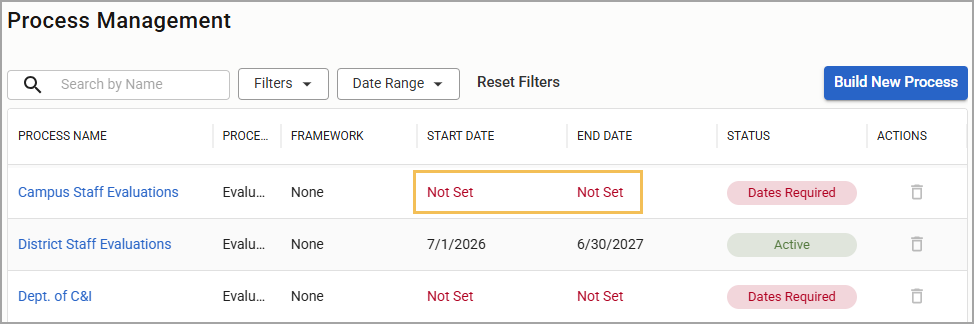
Do not delete existing process. Leave the Start Date and End Date fields as Not Set, indicating that the process is inactive. An inactive process cannot be assigned to users.
Note: Evaluators will need to select their staff and assign a new evaluation process.
Verifying Prebuilt Forms
Next, you must locate and verify that you have Eduphoria’s prebuilt forms.
Quick Guide
Select Settings (), and then select Form Management.
Select the Prebuilt Forms tab.
Select each form type and verify that you have each of the following forms in the table:
Reflections
T-TESS v2 - BOY - Self-Assessment (GSPD Part I)
T-TESS v2 - EOY - Goal Reflections (GSPD Part II)
Walkthroughs
T-TESS v2 Domains 2-3 Walkthrough (Look Fors)
T-TESS v2 Domains 2-3 Walkthrough (Comment Boxes)
T-TESS v2 Domains 2-3 Walkthrough (Ratings)
T-TESS v2 Domains 2-3 Walkthrough (Checklists & Ratings)
T-TESS v2 Domain 1 Only Walkthrough (Language for Both)
Observations
T-TESS v2 Pre-Obs. Conference
T-TESS v2 Observation
T-TESS v2 Observation (descriptors from both)
T-TESS v2 Observation (grouped)
T-TESS v2 Post-Obs. Conference
Summatives
T-TESS v2 Summative
T-TESS v2 Summative (descriptors from both)
T-TESS v2 Summative (grouped)
If any are missing or don’t appear properly tagged, contact Support.
Illustrated Guide
Step 1: Select Settings (), and then select Form Management.
.png)
Step 2: Select the Prebuilt Forms tab.
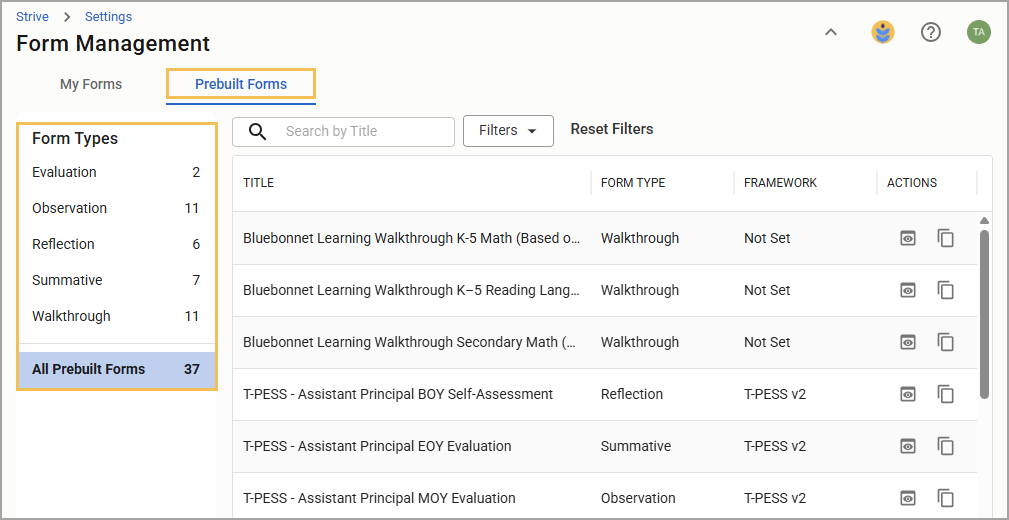
Step 3: Select each form type and verify that you have each of the following forms in the table:
Form Type | Form Title |
|---|---|
Reflections | T-TESS v2 - BOY - Self-Assessment (GSPD Part I) T-TESS v2 - EOY - Goal Reflections (GSPD Part II) |
Walkthroughs | T-TESS v2 Domains 2-3 Walkthrough (Look Fors) T-TESS v2 Domains 2-3 Walkthrough (Comment Boxes) T-TESS v2 Domains 2-3 Walkthrough (Ratings) T-TESS v2 Domains 2-3 Walkthrough (Checklists & Ratings) T-TESS v2 Domain 1 Only Walkthrough (Language for Both) |
Observations | T-TESS v2 Pre-Obs. Conference T-TESS v2 Observation T-TESS v2 Observation (descriptors for both) T-TESS v2 Observation (grouped) T-TESS v2 Post-Obs. Conference |
Summatives | T-TESS v2 Summative T-TESS v2 Summative (descriptors for both) T-TESS v2 Summative (grouped) |
Tip: Use the Observation and Summative versions with descriptors for both if some teachers are using High-Quality Instructional Materials (HQIM). Having the language for both in one document allows evaluators to use the same form for all and not split the data.
Note: Framework settings and tags are already set for prebuilt forms.
Step 4: If any are missing or don’t appear properly tagged, contact Support.
Building a New T-TESS v2 Process
Next, you’ll build a new T-TESS v2 process.
Quick Guide
Select Settings (), and then select Process Management.
Select Build New Process.
Type “T-TESS Teacher v2” in the Process Name box.
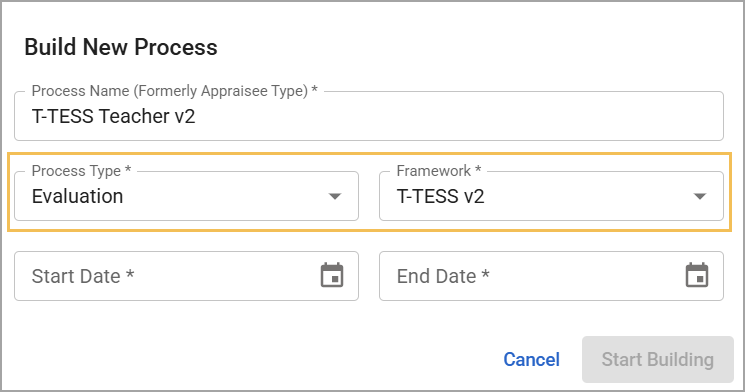
Set your Process Type as Evaluation and your Framework as T-TESS v2.
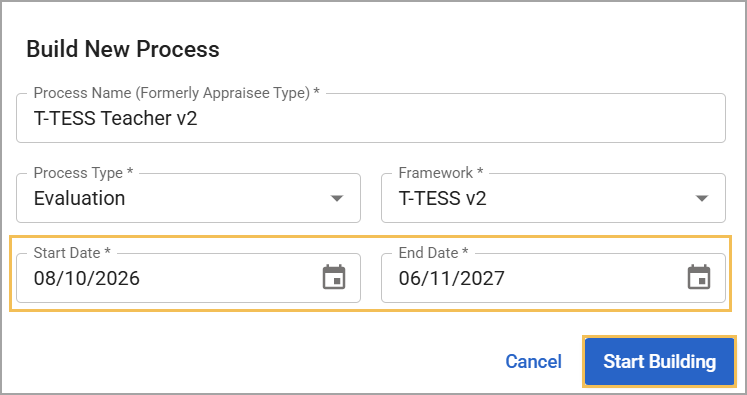
Set the Start and End Dates of the process, then select Start Building.
Set up the evaluation process by creating and modifying steps and tasks.
Assign Forms or Goals to each task as you create them (see a sample process in Step 7 of this section’s Illustrated Guide).
For Forms tasks, attach the appropriate form (see a list of recommended forms in Step 8 of this section’s Illustrated Guide). Set the number required to complete and a due date for completion to help evaluators monitor their staff’s progress in the Overview and Activity Tracker.
Illustrated Guide
Step 1: Select Settings, and then select Process Management.
.png)
Step 2: Select Build New Process.
.png)
Step 3: Type “T-TESS Teacher v2” in the Process Name box.
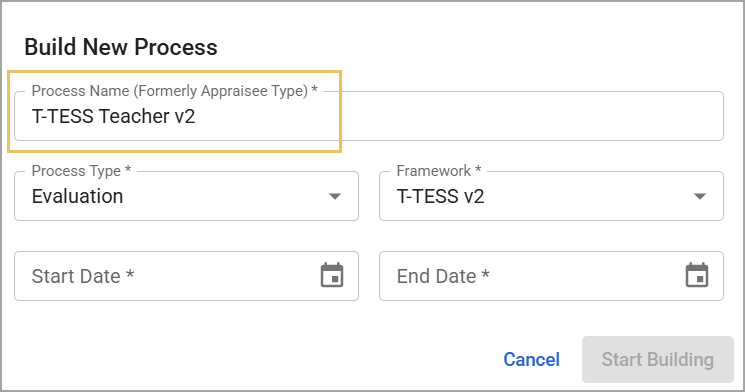
Step 4: Set your Process Type as Evaluation and your Framework as T-TESS v2.
Step 5: Set the Start and End Dates of the process, then select Start Building.
Step 6: Set up the evaluation process by creating and modifying steps and tasks.
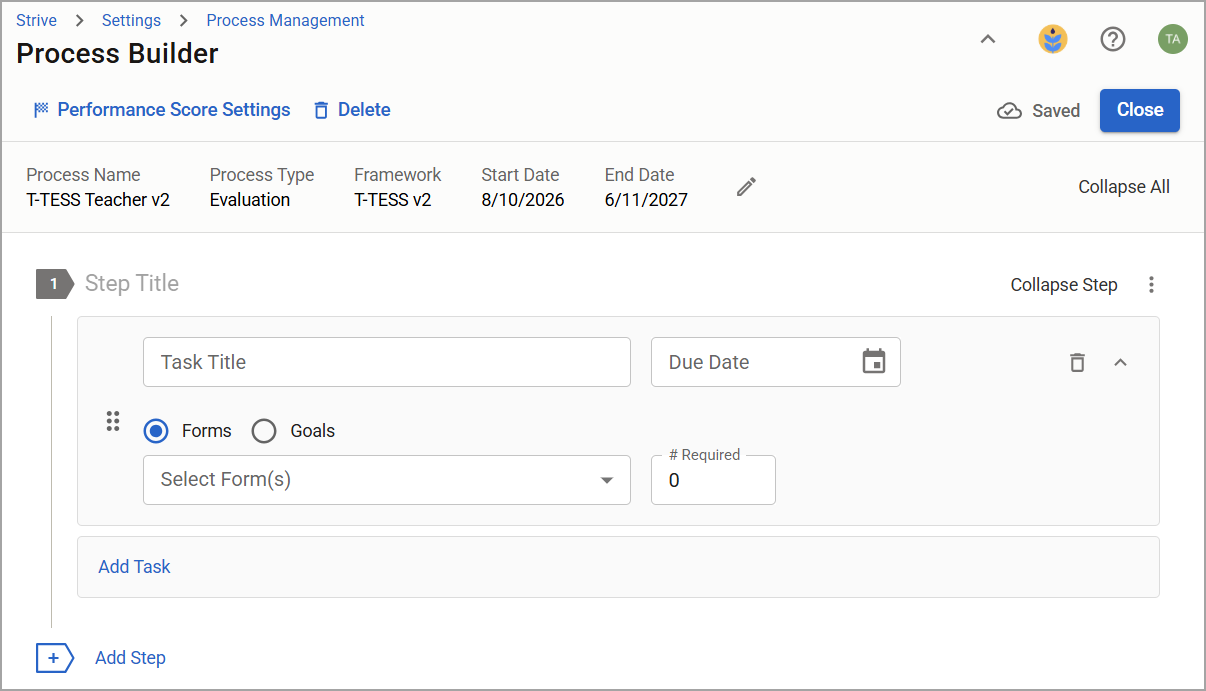
Step 7: Assign Forms or Goals to each task as you create them.
Sample Process
Step Title | Task Title | Task |
|---|---|---|
Goal Setting | Self-Assessment | Form |
Professional Goal | Professional Goal | |
Student Growth Goal | Student Growth Goal | |
Walkthroughs | Walkthroughs | Form |
Observation | Pre-Observation Conference | Form |
Observation | Form | |
Post-Observation Conference | Form | |
End-of-Year Conference | Goals Reflection | Form |
Summative | Form |
Step 8: For all tasks except the Professional Goal and Student Growth Goal, attach the appropriate form. Set the number required to complete and a due date for completion to help evaluators monitor their staff’s progress in the Overview and Activity Tracker. All selections and changes save automatically.
Note: For data collection purposes, Eduphoria recommends that you select only one walkthrough form as your primary for the required T-TESS Walkthroughs task. Other forms can be used in a separate task.
.png)
Recommended Forms
Step Title | Task Title | Form Type | Form Title |
|---|---|---|---|
Goal Setting | Self-Assessment | Reflection | T-TESS v2 - BOY - Self-Assessment (GSPD Part I) |
Walkthroughs | Walkthrough | Walkthrough | T-TESS v2 Domains 2-3 Walkthrough (Look Fors) |
Walkthrough | T-TESS v2 Domains 2-3 Walkthrough (Comment Boxes) | ||
Walkthrough | T-TESS v2 Domains 2-3 Walkthrough (Ratings) | ||
Walkthrough | T-TESS v2 Domains 2-3 Walkthrough (Checklists & Ratings) | ||
Observation | Pre-Observation Conference | Observation | T-TESS v2 Pre-Obs. Conference |
Observation | Observation | T-TESS v2 Observation | |
Post-Observation Conference | Observation | T-TESS v2 Post-Obs. Conference | |
End-of-Year Conference | Goals Reflection | Reflection | T-TESS v2 - EOY - Goal Reflections (GSPD Part II) |
Summative | Summative | T-TESS v2 Summative |
Your new T-TESS v2 process is now set up and ready to use. Evaluators must select the T-TESS v2 process for the teachers they evaluate with this framework.
Making Old Forms Inactive
Form Management contains all active forms and allows appraisal administrators to make them inactive. Making a form inactive moves it to the Inactive Forms section, removes it from processes and report selections, and maintains historical data for analysis. In addition, you can reactivate inactive forms.
Locate the old form under the appropriate form type, then select the Make Inactive icon.
.png)
If the Make Inactive icon is grayed out, that means the form is currently associated with a process and cannot be made inactive.