Eduphoria’s Management application has a new navigational structure, streamlining how system administrators manage critical tasks for their district and schools. We have not added new features or removed existing ones, but merely improved the way you can locate them.
What’s changed?
While the functionality of all Management features remains the same, we’d like to show you where you can find them. Depending on your roles and rights, some elements of the navigation might be hidden.
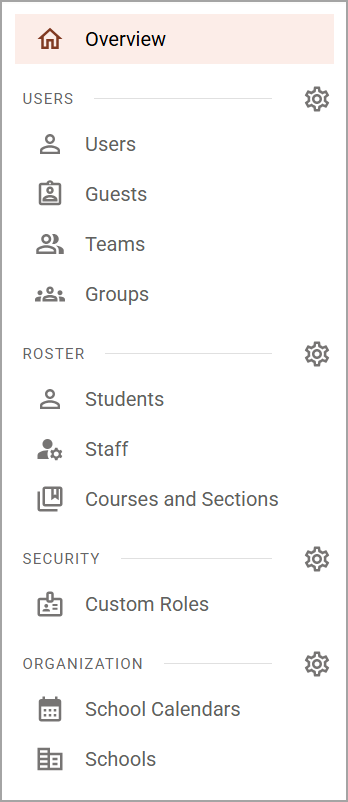
Overview
The Overview acts as Management’s home screen, highlighting new and noteworthy features or recommendations to check out.
The Users Section
Select Users to manage user accounts across the district, assign roles and rights, update and delete profiles, and add users to groups.
Under Guests, you can edit contact information and general information for guest accounts, such as names, email addresses, passwords, and organizations. You can also delete guest accounts.
Teams is where you manage established Teacher Teams. You can update the team name, determine if the team is used for Aware or Forethought, and add or remove staff to and from the team.
Finally, select Groups to add and remove users to and from Schools, System Groups, and Custom Groups.
Users Settings
Select the Users Settings gear to perform actions related to accounts, including creating new users, guests, teams, and groups; importing users, managing user profiles, and undeleting users.
.png)
The Roster Section
Visit Students to view roster information by student. Review student identification numbers and rostered schedules.
Select Staff to view employee identification numbers, classes, rostered students, and more.
Finally, Courses and Sections allows you to review your district’s course list by school. You can find identification numbers, a course’s subject area, and sections within the course, both past and active.
Roster Settings
Select the Roster Settings gear to manage information related to rosters, classes, and student accounts. Here, you can approve student access lists, set subject information, manage the roster import, import student passwords, and upload student pictures.
.png)
The Security Section
Custom Roles is where you manage the custom roles you have created for your district. Here, you can limit the role to a user’s school or apply it district-wide, set its name and description, and assign rights per application.
Security Settings
Select the Security Settings gear to create custom roles, run reports for roles and rights assignments, and set up integrations with Active Directory, remote authentication, single sign-on, and more.
The Organization Section
Select School Calendars to set up the instructional and reporting calendars for the school year.
Under Schools, configure school details, including setting general information like the current principal, viewing which applications the school is licensed to use, adding feeder schools, and entering contact information.
Organization Settings
Select the Organization Settings gear to manage general district settings and user password requirements, create new school calendars or a new school, configure a custom email server, or view licensing information.

What do I need to do?
Users aren’t required to do anything to see the updated navigation. As always, we encourage our district-level users and system administrators to ensure they and their staff are assigned the correct roles and rights that apply to their various tasks.
For documentation about these features, visit the Management section of our knowledge base to get started.